
Disclosure: This article contains affiliate links. If you book through one, I may earn a small commission at no extra cost to you.
In a hurry? Everything in this guide, in one list:
- Airalo Japan eSIM — the most popular starting point
- Ubigi Japan eSIM — the strong data-value rival
- Klook Japan eSIM — the budget listing worth price-checking
- Sakura Mobile eSIM — unlimited data on NTT Docomo
- Ninja WiFi pocket router — airport pickup, for groups
Whichever you pick, set it up before you land.
- Quick Answer: The Best eSIM for Japan in 2026
- Quick Comparison Table
- Which Mobile Network Does Your Japan eSIM Use?
- How Much Data Do You Really Need in Japan?
- The 7 Best eSIMs for Japan in 2026
- The Japanese eSIMs Almost No Guide Mentions
- Data-Only Means No Phone Number — and in Japan That Matters
- eSIM vs Pocket Wi-Fi vs a Physical SIM
- How to Install and Activate Your eSIM
- Where You’ll Actually Lose Signal in Japan
- Common Problems and How to Fix Them
- FAQ: Quick Answers About eSIMs for Japan
- Final Thoughts: What I’d Tell a Friend
Quick Answer: The Best eSIM for Japan in 2026
If you’re planning your first trip to Japan, the eSIM question probably feels like homework you didn’t ask for. Dozens of brands, all promising cheap unlimited data — and many of the top-ranking guides are written by the eSIM companies themselves. I live in Japan, and I’m not an eSIM company, so let me give you the short version first.
- Best overall: Ubigi — runs on docomo and au, the two networks that keep working out in the countryside. 3GB for 15 days is just $7.50.
- Best for first-timers: Airalo — the world’s biggest travel eSIM with over 30 million users, and support that answers 24/7 in multiple languages. 10GB for 30 days is $18.
- Best truly unlimited: Sakura Mobile — a Japan-based provider whose 5G unlimited plan has no speed-cap fine print.
- Best if you need a phone number: Mobal — the rare travel plan that comes with a real Japanese number, so you can call Japan’s emergency numbers (110 and 119 — there’s no 911 here) and book restaurants like a local.
- Best for easy one-stop booking: Klook’s Japan eSIM — over 2 million travelers have bought it, a week with 3GB costs $5.55, and it lives in the same app you might already be using for tours and tickets.
- Best for avoiding wasted data: b-mobile — a Japanese carrier where you build your own plan, choosing exactly how many days and how many gigabytes you need instead of paying for a package that doesn’t fit your trip.
Every one of these has a catch, though — and the catch is usually the part worth knowing. You’ll find the full comparison table below, and right after it, the one thing almost nobody tells you: which Japanese network your eSIM actually connects to.
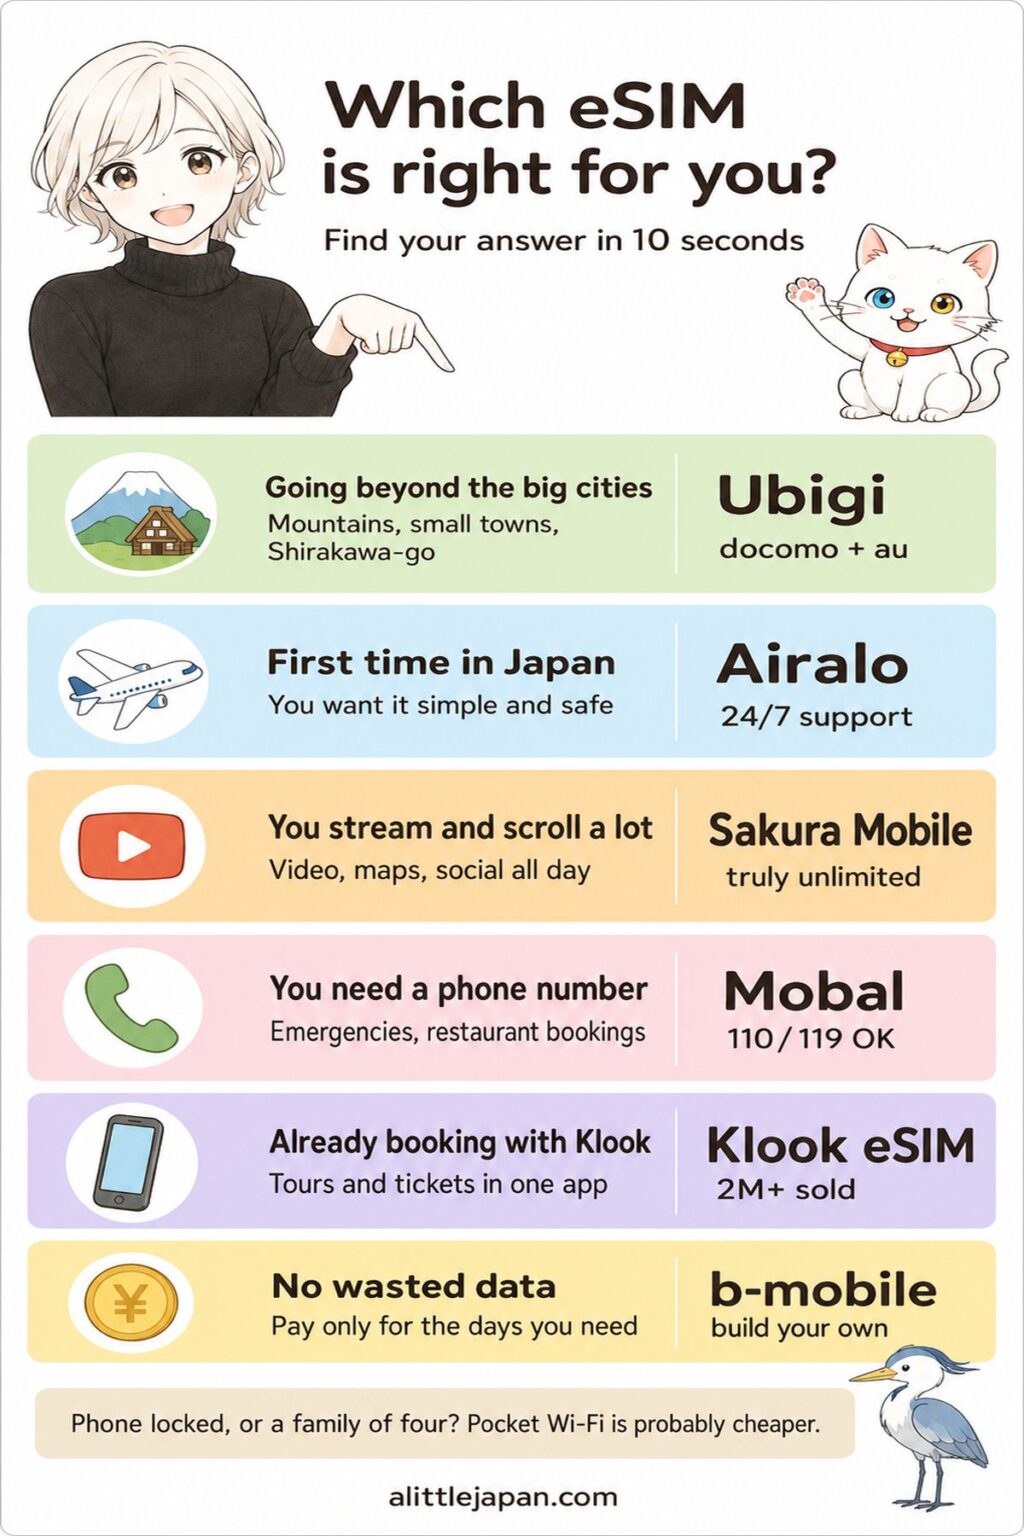
“Just tell me which one to buy”
If you’d rather not read four thousand words: buy Ubigi.
It runs on both docomo and au, giving you better coverage outside the major cities. It tells you exactly where “unlimited” ends — 25GB on the 7-day plan, then 2Mbps — instead of leaving you to find out in a hotel room in Kanazawa. And a 3GB plan for a two-week trip costs $7.50.
Two exceptions, and they’re the only two.
If the thought of troubleshooting a dead connection alone in a country where you can’t read the signs makes you anxious, buy Airalo instead. You’re paying a few dollars more for people who answer at three in the morning in your language. For a lot of first-time visitors that’s the right trade.
And if you need to be reachable on a Japanese phone number, none of the above applies to you. You need Mobal. The section on phone numbers explains why, and it’s the part of this guide I’d least like you to skip.

Quick Comparison Table
 Prices were checked on July 28, 2026. This is the part of any eSIM guide that goes stale fastest, so it’s worth confirming on the provider’s own page before you pay.
| Provider | Example plan | Network | Japanese phone number | Best for |
|---|---|---|---|---|
| Ubigi | $7.50 — 3GB / 15 days | docomo + au | No | Getting out of the cities |
| Airalo | $18 — 10GB / 30 days | SoftBank + au | No | Your first trip |
| Klook eSIM | $5.55 — 3GB / 7 days (unlimited: $22.95 / 7 days) |
SoftBank or docomo — depends on plan type | No | Booking it all in one app |
| Holafly | $36.50 — unlimited / 10 days | au + SoftBank | No | Not counting gigabytes |
| Saily | $3.99 — 1GB / 7 days | Not disclosed | No | The lowest sticker price |
| Sakura Mobile | ¥5,775 — unlimited / 7 days (tax incl.) | au (unlimited) / docomo (3GB a day) | No | Unlimited that stays fast |
| Mobal | ¥4,950 + from ¥1,650/month — voice + data (first month pro-rated) | SoftBank + docomo | Yes | Anyone who needs to be reachable |
| b-mobile | You pick: 1–30 days, 1–100GB | docomo | No | Paying for exactly what you use |
| IIJ Japan Travel SIM | ¥5,780 — 55GB / 30 days | docomo | No | Buying after you land |
Two things that don’t fit neatly in a table. Hotspot sharing is allowed on Ubigi, Saily, Klook and Airalo at no extra charge — though on Airalo’s unlimited plans, whatever you share comes out of the same daily allowance. Sakura Mobile allows it with a 6GB cap on its unlimited plan. Holafly is the one to look at twice: it doesn’t publish a hotspot allowance for Japan at all — not on its Japan page, not in its FAQ, not in its own guide to sharing data. So if you were picturing yourself working off a laptop in a café in Nakameguro, you would be buying without knowing what you get.
 And every provider in that table except Mobal is data-only. That sounds like a technicality. In Japan it isn’t, and I’ll come back to why.
Which Mobile Network Does Your Japan eSIM Use?
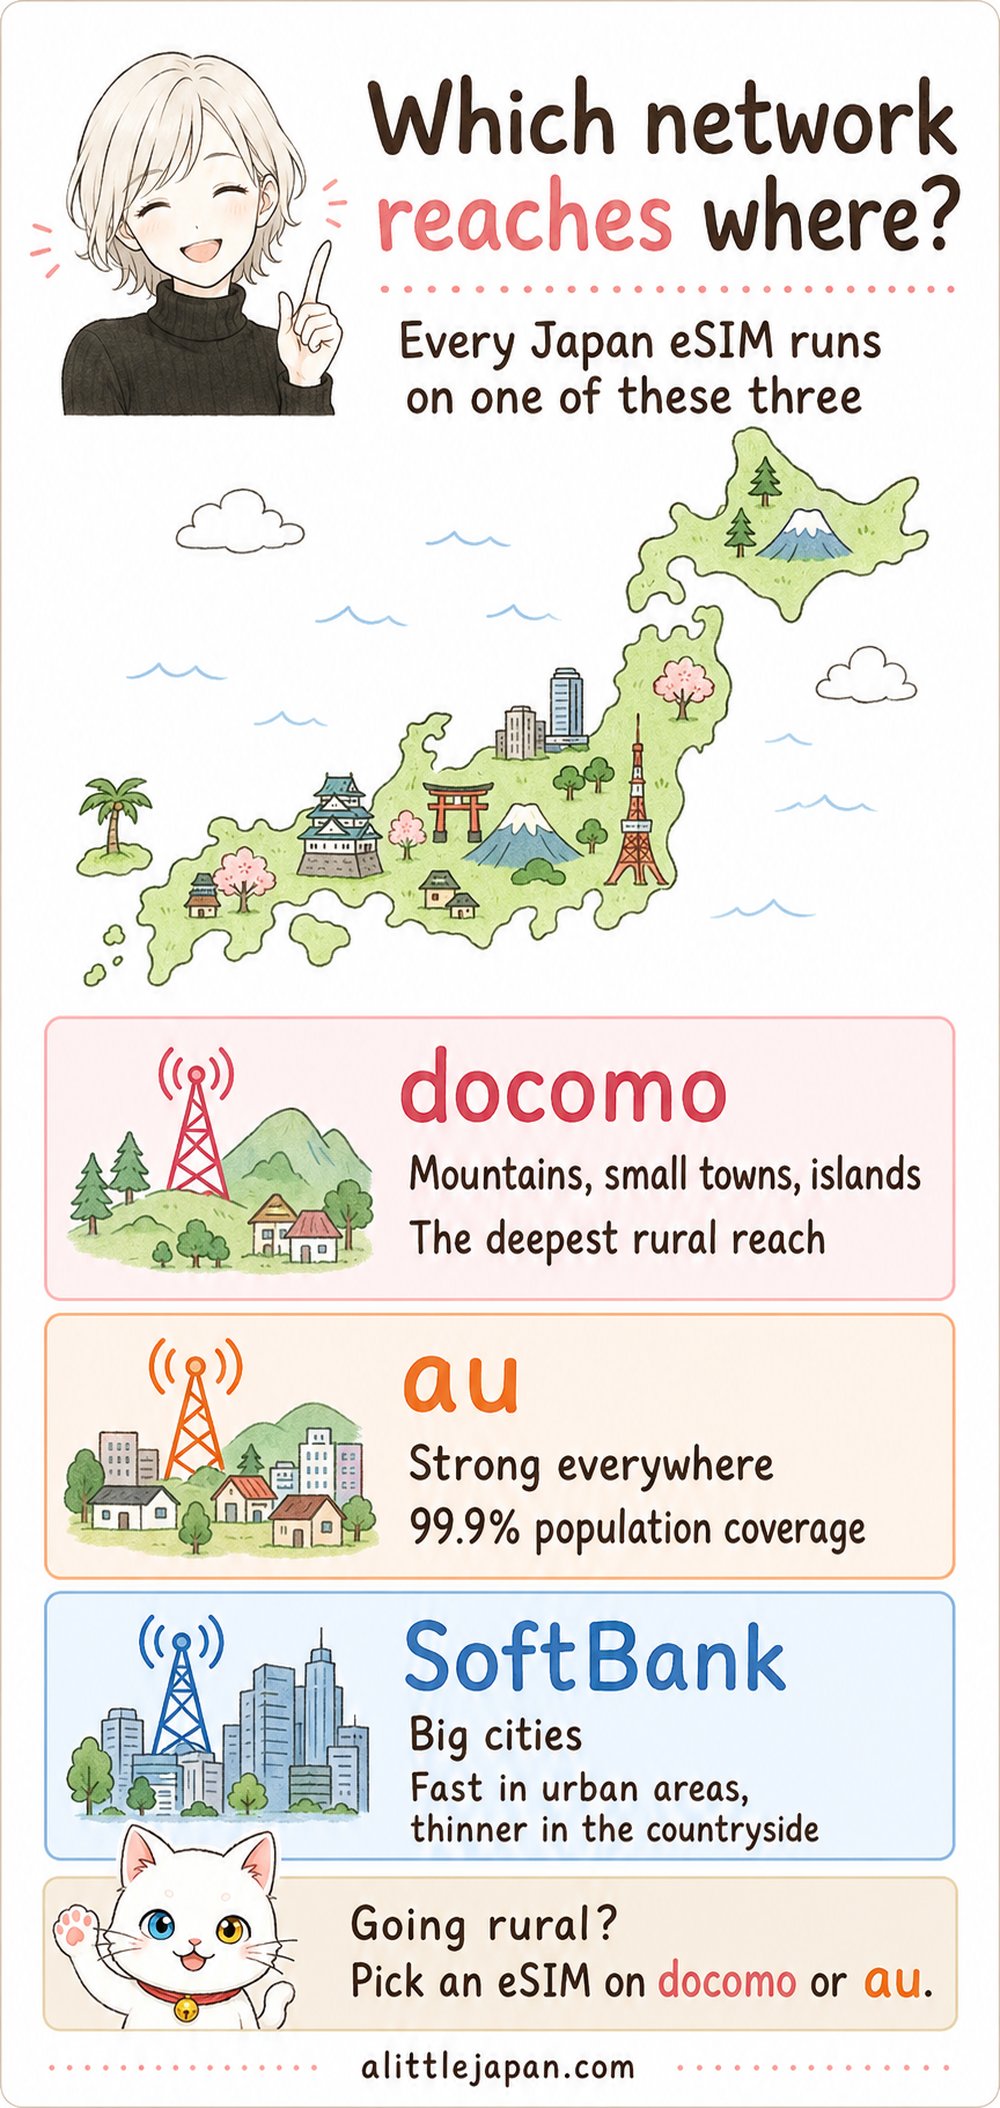
Here’s something the brand names hide: every travel eSIM in this guide connects to one of three major Japanese networks — docomo, au, or SoftBank. Each brand is renting space on one or two of those three, which means the sticker on the box matters far less than the network underneath it.
The three don’t behave the same way once you leave the city. docomo has the deepest reach into the mountains, the small towns, and the islands — it’s the one Japanese families pick when they live somewhere rural. au covers 99.9% of the population by KDDI’s own count and sits comfortably in the middle. SoftBank is strong and fast in dense urban areas, but its footprint thins out fastest once you’re off the main corridors.
 So here’s the mapping, which almost no comparison article prints:
| eSIM | Network underneath |
|---|---|
| Ubigi | docomo + au |
| Airalo | SoftBank + au |
| Holafly | au + SoftBank |
| Klook eSIM | SoftBank on the per-day plans, docomo 4G on the total-data plans (you pick one at checkout — it does not switch between them) |
| Sakura Mobile | au on unlimited plans, docomo on the 3GB-a-day plan |
| b-mobile / IIJ | docomo |
| Saily | Not disclosed |
Now, if your trip is Tokyo, Kyoto, Osaka and the shinkansen between them, this whole section is academic. All three networks will keep up. But if Shirakawa-go is on your list, or Koya-san, or the Japanese Alps, or anywhere in Tohoku or Hokkaido outside the cities, you want an eSIM that runs on docomo or au. That single choice will do more for your trip than any amount of comparing gigabyte prices.
Which brings me to Saily. It’s the cheapest name on the list, and it’s backed by the company behind NordVPN, so it isn’t a fly-by-night operation. But it doesn’t publish which Japanese network it uses, and I couldn’t find it stated anywhere official. For a Tokyo city break that’s a risk you can absorb. For two weeks of rural driving, buying a network you can’t identify is a gamble I wouldn’t take.
Two of those names come up more often than any other. If you are choosing between them, I compare them head to head — including which Japanese network each one actually uses — in Airalo vs Ubigi in Japan.
How Much Data Do You Really Need in Japan?
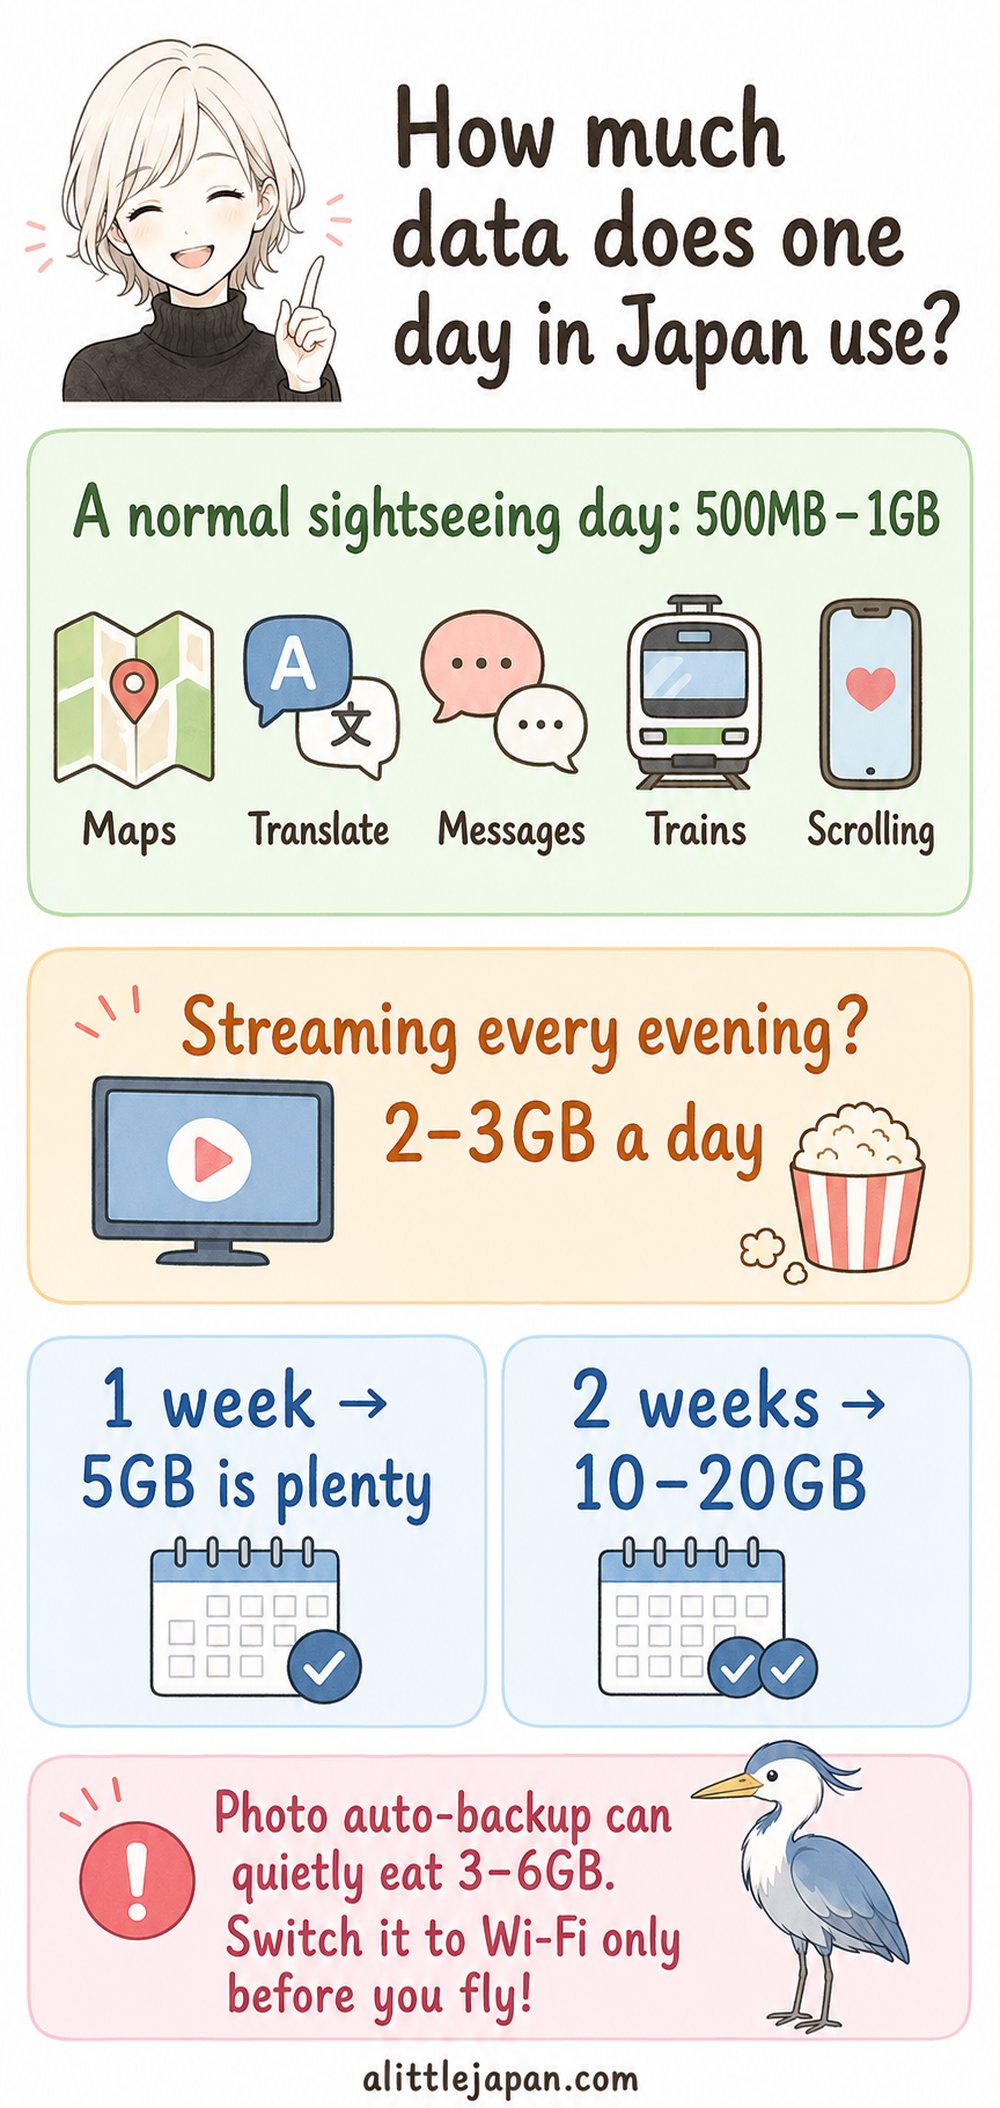
Most travelers buy too much data for Japan. It’s an easy mistake to make when every provider’s front page is shouting about unlimited plans.
Here’s what a normal sightseeing day actually costs you. Google Maps running while you walk, Google Translate pointed at menus and signs, messaging your family, checking train times, a bit of scrolling on the train — that lands somewhere between 500MB and 1GB. If you’re watching videos or posting reels every evening, call it 2 to 3GB a day instead.
So for a week, 5GB covers most people comfortably. For two weeks, 10GB is fine if you’re the maps-and-messages type, and 15 to 20GB if you know you’ll be streaming.
But two things change that math, and both work in your favor if you know about them.
The first is that you’ll be on Wi-Fi far more than you expect. Your hotel has it. So does every convenience store, most cafés, most major stations, and the shinkansen. In practice your phone spends a good part of the day not touching your eSIM at all.
 The second is the one I’d most like you to act on before you fly. Your phone is probably backing up photos automatically, and Japan is a place where people take a lot of photos. Left on mobile data, that quiet background upload can eat 3 to 6GB over a two-week trip — data you paid for and never knowingly used. Open your photo app’s settings and switch backups to Wi-Fi only. It takes about thirty seconds and it’s the single most useful thing in this article.
One more thing worth knowing: nearly every provider here lets you top up mid-trip. So if you’re torn between two sizes, take the smaller one. Running slightly short costs you a few dollars and two minutes in the app. Buying more than you need gets you nothing back.
The 7 Best eSIMs for Japan in 2026

Ubigi — the best all-rounder
 Check current Ubigi Japan eSIM prices →
 Ubigi runs on both docomo and au, which is the widest safety net you can buy without going to a Japanese carrier directly. It’s also honest in a way the rest of this industry mostly isn’t: where other companies say “unlimited” and leave you to find out what that means, Ubigi publishes the exact number — 25GB on the 7-day plan, 30GB on 15 days, 60GB on 30 days, and 2Mbps after that. Small plans are genuinely cheap at $7.50 for 3GB over 15 days, and hotspot sharing is allowed at no extra cost. It’s run by a subsidiary of NTT, Japan’s largest telecom group.
The weak spot is support. There’s no phone line, and help runs through a form and an AI chat that reviewers describe as slow and inconsistent. Its Trustpilot score sits at 4.1 based on more than 42,000 reviews, with a noticeable band of one-star complaints about connection failures and login problems. One more thing to watch: the monthly subscription plans carry a three-month minimum, which is not what you want for a two-week trip. Buy the prepaid travel plan, not the monthly.
Best for: anyone leaving the big cities, and light users who want a small, cheap plan that still works everywhere.
Airalo — the safest first eSIM
Check current Airalo Japan eSIM prices →
Airalo passed 30 million customers this year, and that scale buys you something real: support that answers around the clock in multiple languages. If this is your first time using an eSIM and the whole idea makes you nervous, that matters more than saving four dollars. The Japan range, sold as “Moshi Moshi,” is the broadest here — 1GB for three days at $4.00 all the way up to 20GB for a month at $25, with 10GB for 30 days at $18 sitting in the sweet spot.
It runs on SoftBank and au, with no docomo, so it’s a slightly thinner net in the mountains than Ubigi. Its unlimited plans slow down after 3GB a day, and speeds are capped even before you reach that threshold. The Japan unlimited pricing also went up noticeably earlier this year — so buy Airalo for the fixed-data plans and the support, not as your budget option. Hotspot sharing works, but on unlimited plans it counts against the same daily allowance.
Best for: first-time visitors, and anyone who wants a human to answer at 2am.
Klook eSIM — the one most travelers actually buy
Check current Klook eSIM prices for Japan →
This is the quiet giant. Klook’s own Japan eSIM has been bought over two million times and holds 4.6 stars across nearly 45,000 reviews, which makes it the single best-selling travel eSIM for Japan I could find anywhere. A week with 3GB costs $5.55, the day-by-day and total-data options are sliced finely enough to match a three-night trip without waste, and — the real appeal — it sits in the same app you may already have open for your USJ tickets and day tours. One checkout, one place to find your voucher.
Two things to understand before you buy, because the product page doesn’t make either of them obvious.
The first is that the network isn’t automatic. Klook’s own FAQ explains that the per-day plans run on SoftBank, where you get 5G, while the total-data plans run on docomo at 4G only. You’re choosing a network at checkout without being told that’s what you’re doing — so if you’re heading for the mountains, pick a total-data plan, and if you want 5G in the cities, pick a per-day one.
The second is that Klook isn’t a phone company. The eSIM that installs on your phone identifies itself as Redtea Mobile, and the settings match a white-label provider’s own Japan product, which means there are several companies between you and the actual network. Where that shows up is support: when something goes wrong, your first line of help is a chat with the seller inside the Klook app — no phone number, no telecom help desk.
Credit where it’s due on the unlimited plans, though. Klook states the limit plainly on the product page: 10GB a day at full speed, then 128kbps. That’s a far more generous daily allowance than most of its rivals — Airalo gives you 3GB a day, Holafly won’t say — and at $22.95 for a week it undercuts Ubigi’s $25 while allowing far more full-speed data. The catch is what happens after: 128kbps is slow enough that you’ll notice within seconds, where Ubigi’s 2Mbps still runs maps and messages. More room before the wall, and a harder wall when you hit it.
Best for: travelers already booking tours and tickets through Klook who’d rather not open an account with yet another company.
Holafly — unlimited, with an asterisk
Holafly has become the name people think of for unlimited data, and its Trustpilot page carries over 100,000 reviews at 4.7 stars, so plenty of travelers come home happy. Setup is genuinely painless, it runs on au and SoftBank, and if you don’t want to keep track of gigabytes, it keeps things simple.
Now the asterisk. Holafly doesn’t publish its fair-use threshold for Japan, so nobody outside the company can tell you at what point “unlimited” starts slowing down — and because the slowdown is written into the terms, it isn’t grounds for a refund. Hotspot sharing isn’t documented anywhere on its site either, which matters if you planned to work from a laptop. Refunds are only available before you activate, minus a fee, and the recent low reviews cluster around refunds taking months and support that’s become a chatbot.
Best for: heavy phone users on a city-based trip who value simplicity over knowing the details. If you want unlimited and the details, Sakura Mobile is the better buy.
Saily — the cheapest name here
Saily comes from the company behind NordVPN. A 1GB plan for one week costs $3.99, and hotspot sharing is included without a separate cap. On price alone it wins. It also deserves credit for something Holafly won’t do: it states its unlimited limits openly — 5GB a day at full speed, then 1Mbps with no cut-off.
But as I said above, Saily doesn’t disclose which Japanese network it uses, and there are scattered reports of traffic being routed outside Japan, which can mean Japanese websites and services see you as being somewhere else. For a few days of maps and messages in Tokyo, that’s unlikely to trouble you. For a rural trip, or if you’ll be using Japanese booking sites, I’d spend the extra few dollars elsewhere.
Best for: short, city-only trips where price is the deciding factor.
Sakura Mobile — unlimited that stays fast
Sakura Mobile’s eSIM on Klook → — handy if you’d rather not create another account.
Sakura Mobile is a Japan-based provider built for foreign visitors and residents, and its 5G unlimited plan is the only one in this article where the company states outright that there’s no fair-use throttle. No daily cap, no mystery threshold. It runs on au for unlimited plans and docomo for the 3GB-a-day option, it takes PayPal and overseas cards, and there’s English phone support — an actual person, on the phone, which almost nobody else offers.
A week of unlimited runs ¥5,775 including tax, and there’s an automatic 10% off if you buy two or more — worth knowing if you’re travelling as a couple or a family. The cheaper option, 3GB a day for a week, is ¥4,620.
Three catches. Prices only appear once you enter your travel dates, so you can’t comparison-shop at a glance. Hotspot sharing on the unlimited plan is capped at 6GB, which is generous next to Holafly but still a cap. And despite the phone support, the travel plans themselves are data-only — there’s no Japanese phone number attached. If that’s what you’re after, read on.
Best for: heavy users, remote workers, and anyone who’s been burned by the word “unlimited” before.
Mobal — the only one that gives you a phone number
Check current Mobal voice + data eSIM prices →
Every other option in this article is data-only. Mobal’s voice plans come with a real Japanese number beginning with 070, 080 or 090, and the company states plainly in its own help documentation that you can dial 110 for police and 119 for fire and ambulance, and that data-only products cannot. That sentence is why this option exists in this guide, and the next section explains why it matters more than it sounds.
A number also solves smaller problems throughout your trip: restaurant and ryokan booking forms that reject foreign numbers, a taxi company that needs to call you back, the lost-property office at a station. Voice-and-data costs ¥4,950 for the eSIM, then from ¥1,650 a month depending on how much data you choose. Your first month is pro-rated from the day you activate, so on a two-week trip you pay only for the days you actually use. Calls and texts are billed as you use them.
One thing to plan for: because it comes with a real phone number, Japanese law requires Mobal to check your ID, so this eSIM isn’t emailed to you like the data-only ones. You can have an access code posted to you before your trip, or pick one up free at an airport or tourist information counter in Japan — just show your passport.
It’s more expensive than a data-only eSIM, so this is a plan you buy for the number, not the data. Mobal is British in origin and operates in Japan; I mention that only because it’s often assumed to be a Japanese company.
Best for: families with children, longer stays, solo travelers heading into rural areas, and anyone who wants to be reachable by phone.
The Japanese eSIMs Almost No Guide Mentions

Everything above this line can be bought from your sofa before you fly. This section covers Japanese providers that many English-language guides overlook. Two of them can be bought in a convenience store after you land, which makes this the section to remember if something goes wrong.
If your eSIM doesn’t work when you land
It happens more often than the industry likes to admit — a QR code that won’t scan, a plan that activates on the wrong date, a phone that needs a carrier setting it can’t download without a connection. If you’re standing in an arrivals hall with a dead eSIM, you have two options that don’t involve finding airport Wi-Fi and starting over.
 Lawson, the convenience store chain with around 14,600 branches nationwide, sells a prepaid eSIM card over the counter for cash. It’s KDDI’s own product for visitors, it runs on the au network, and you activate it by scanning the QR code on the back of the card — about three minutes, start to finish. There’s one in almost every neighbourhood and most of them are open 24 hours. (And while you’re in there, my guide to Japanese convenience store etiquette will make you feel like a regular.)
Ministop stores sell IIJ’s Japan Travel SIM through the Loppi kiosk inside the shop. It runs on docomo, which is the network you want if you’re heading somewhere rural, and the plans go up to 55GB for 30 days at ¥5,780.
Neither is a bargain compared to buying online in advance — the Lawson card version costs more than double KDDI’s own online price for the same 10GB. But at 9pm on your first night, with no signal and a hotel you can’t find, “more than double” is not the number you’re optimizing for.
Buying Japanese, before you fly
b-mobile is the one I’d point a budget traveler toward. It’s run by Japan Communications, it uses docomo, and instead of picking from a menu you build your own plan — any number of days from 1 to 30, any amount of data from 1 to 100GB. If you know you need 4GB over 9 days, that’s exactly what you pay for, and you can buy it from overseas before you leave.
The catches are real, though. English support is a web form with a reply time measured in business days, so this isn’t the one to buy if you want hand-holding. And when you use up your data it doesn’t slow down — it stops. Topping up costs ¥500 per gigabyte, but you’ll need to find Wi-Fi to do it, which is a frustrating loop to be caught in.
Japan Wireless sells unlimited plans by the day, on au for 5G and docomo for 4G, starting around $5 a day and dropping under $3 a day on longer trips. It’s worth a look if you want unlimited from a Japanese company and Sakura Mobile comes out too expensive for your dates.
One to approach carefully
KDDI’s online version of Japan SIM is genuinely cheap — ¥1,430 for 10GB over seven days, less than half the convenience-store price. But signing up online requires a mobile number from one of twenty designated countries that can receive an SMS, and KDDI doesn’t publish the list publicly. If your number isn’t on it, you can’t complete the purchase. That’s a strange thing to discover the night before a flight, so if you want this one, buy it early enough to find out — or plan to pick up the card in a Lawson instead.
Data-Only Means No Phone Number — and in Japan That Matters
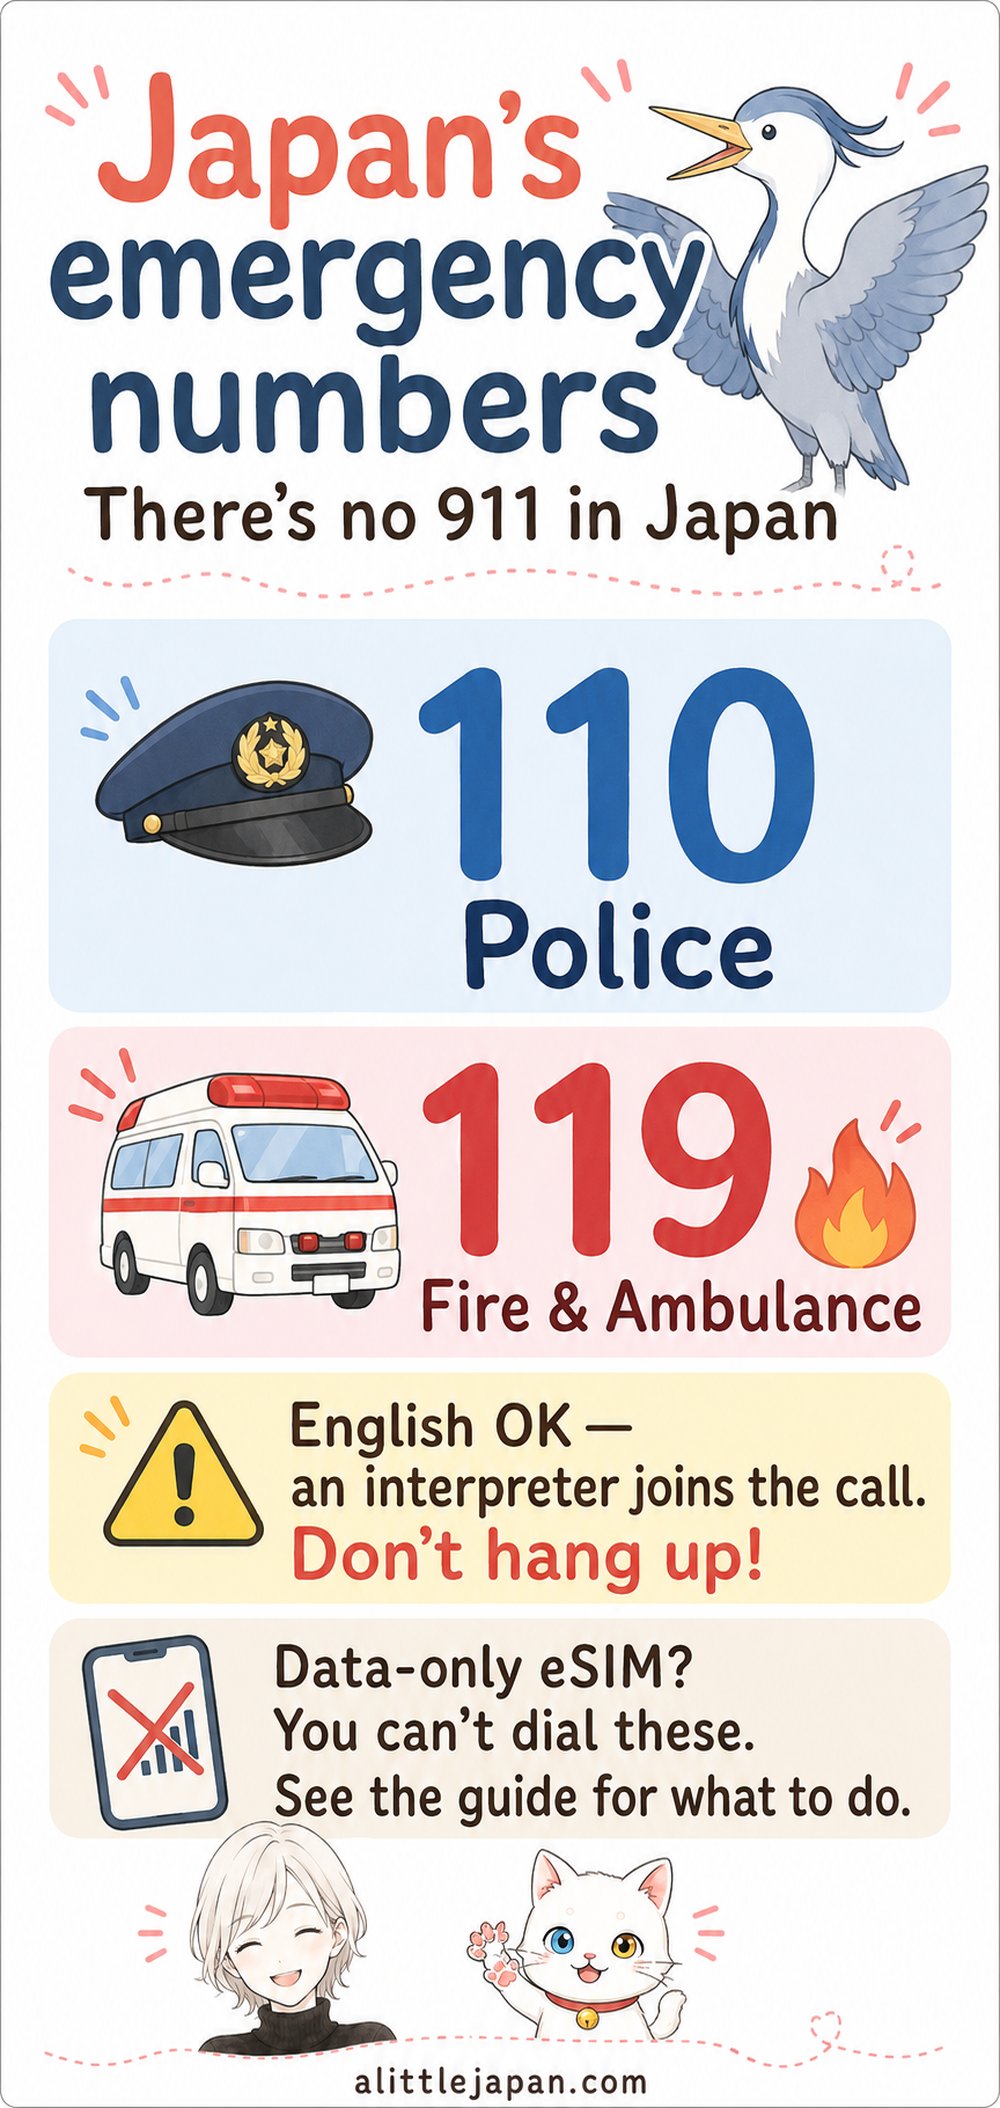
 First, two numbers to save in your memory, because Japan doesn’t use 911. Here, 110 calls the police, and 119 calls fire and ambulance. Those two numbers are the fastest route to help anywhere in the country.
Now, here’s a sentence worth reading twice: with a data-only eSIM, you cannot dial either of them.
That surprises almost everyone, and I understand why. In the United States and across much of Europe, any phone can reach emergency services — no SIM, no account, no credit. It’s a legal requirement there. Travelers reasonably assume the same is true everywhere.
Japan works differently. Emergency calls here have to satisfy three conditions: the call reaches the emergency service, your location is passed along, and the operator can call you back if you’re cut off. A data-only line has no phone number, so it can’t satisfy the third one — and so the call doesn’t go through at all. IIJmio, one of Japan’s larger mobile providers, states plainly in its own FAQ that data SIMs cannot make emergency calls. Mobal puts it in writing too: its voice products can dial 110 and 119, and its data-only products cannot.
Every eSIM in the comparison table above except Mobal is data-only.
What it costs you on an ordinary day
Emergencies are the headline, but the phone number quietly matters all trip. Restaurant and ryokan booking forms often reject foreign numbers outright. A taxi company that can’t reach you will give your booking away. If you leave a bag on a train, the station’s lost property office will want a number to call when it turns up. Japan still runs on phone calls more than visitors expect.
So what should you actually do?
If you’re travelling with children, staying somewhere remote, or you simply want the ability to make a call, buy Mobal. It’s the only travel plan here that comes with a real Japanese number, and its own help pages confirm you can dial 110 and 119 with it.
 And here’s the part that should take a weight off your shoulders: you don’t need Japanese to use those numbers. Japan’s fire and ambulance service runs a three-way interpretation system — you, the dispatcher, and an interpreter on the same call, around the clock, in English and other major languages. As of 2025 it covers about 93% of fire departments nationwide, including every major city. The police handle 110 calls with interpreters too; Tokyo’s police state outright that an interpreter will join the line if you don’t speak Japanese. So if you ever have to make that call: speak English, and if the first voice doesn’t understand you, don’t hang up — stay on the line while the interpreter is brought in.
If you’d rather not buy a voice plan, that’s a legitimate choice — most visitors travel on data-only plans and go home perfectly fine. Just set yourself up properly before you need it:
Save your accommodation’s phone number in your phone before you arrive, and keep the address written in Japanese somewhere you can show a driver. Your hotel’s front desk can make calls on your behalf, and in a genuine emergency that’s usually the fastest route to help. Japan still has public payphones in stations and on street corners, and they can reach emergency services. Save one more number too: the Japan Visitor Hotline, run by the national tourism organization at 050-3816-2787 — it answers around the clock in English, Chinese and Korean, and it’s the number to hand to hotel staff or use from a payphone when you need help that isn’t a life-or-death emergency.
And if you’re on a data connection, you can still reach people through the internet — your travel companions, your embassy, your accommodation — even when you can’t dial a Japanese three-digit number.
One more thing, about earthquakes
Japan broadcasts earthquake and disaster alerts to phones automatically, and they’re genuinely useful — often a few seconds of warning before shaking starts. But whether a foreign-issued eSIM receives them depends on your handset and the network, and I couldn’t find a provider willing to guarantee it. Rather than hope, install a disaster app before you fly. Safety tips, published for visitors by the Japan Tourism Agency, is the one I’d start with; NERV and Yahoo! Bosai are the two apps that most Japanese people I know actually have on their phones. They work over data, so they don’t care whether you have a phone number.
A note for dual-SIM users
If you’re keeping your home SIM in the phone alongside a Japanese data eSIM, check which line is set as your default for calls. There have been cases in Japan where an emergency call failed because the data line was the active one, even though a voice-capable SIM was sitting right there in the same phone. It takes ten seconds to check in your settings, and it’s worth doing now rather than working it out under pressure.
eSIM vs Pocket Wi-Fi vs a Physical SIM
For one adult travelling alone, an eSIM wins on almost every measure. Nothing to collect, nothing to return, nothing to lose. You can stop reading this section.
For a family, the math changes completely, and almost no guide runs the numbers. So let’s run them.
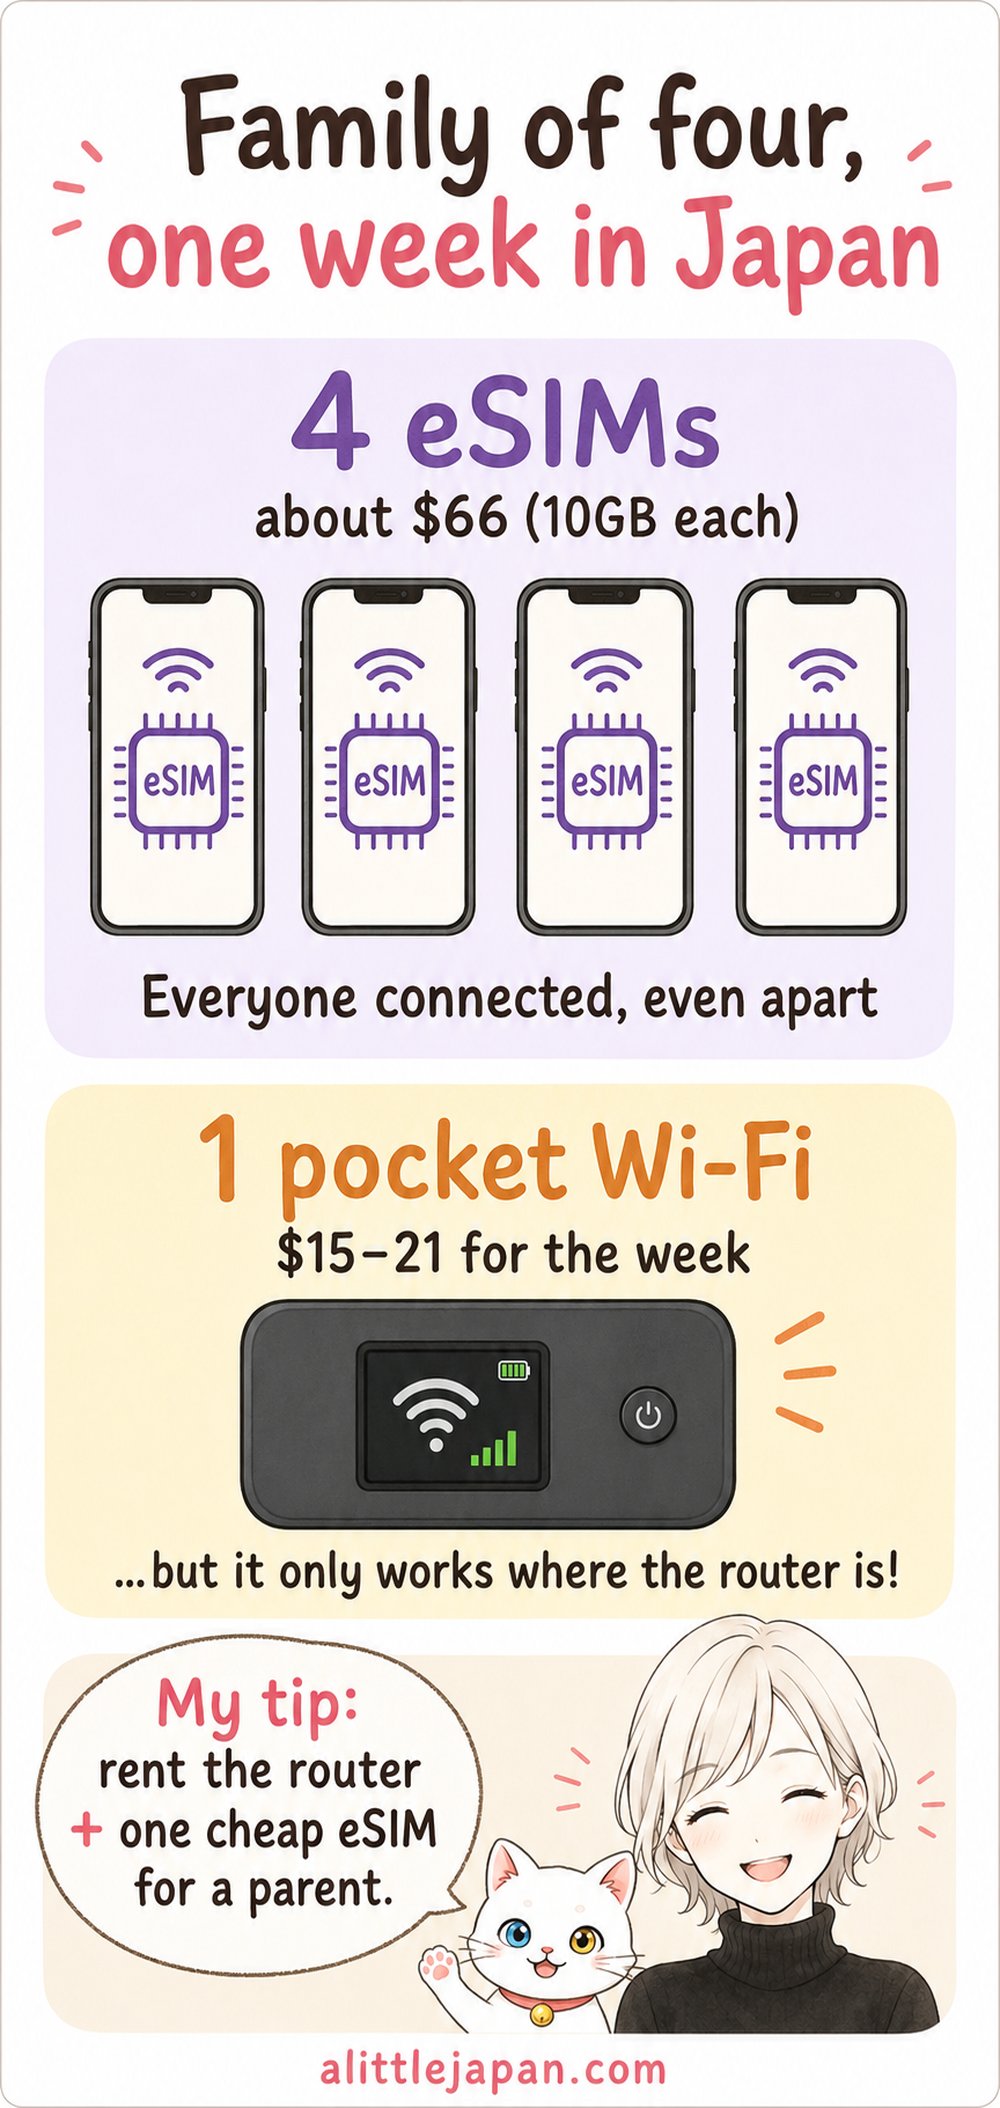
Say four of you are coming for a week. Buy everyone their own eSIM with enough data to be comfortable — 10GB each on Ubigi, at $16.50 — and you’re looking at about $66. Rent one pocket Wi-Fi router with unlimited data instead, picked up at the airport, and you’re looking at roughly $15 to $21 for the same week. That’s not a small gap. That’s three or four times the price for the same trip.
The airport-pickup router I used for that price check → — unlimited data with a power bank included, which is the one most families end up with.
So why doesn’t everyone rent a router? Because the router only works where the router is. The moment your teenager goes off to Akihabara while you take the younger one back to the hotel, one of you has no connection at all. A router also has to be charged, carried, collected on arrival and returned before you fly home — and if it goes missing, you’ll pay for it.
Here’s what I’d actually suggest for a family: rent the router and buy one cheap eSIM for whichever adult is most likely to be somewhere else. A 1GB Klook plan at $1.50, or 3GB of Ubigi at $7.50, is a small price for not losing each other in Shinjuku Station. You still come out far ahead of buying four.
When a physical SIM still makes sense
If your phone was made before around 2018, it may not support eSIM at all — dial *#06# and see whether an EID appears. No EID, no eSIM. A physical SIM delivered to your hotel or collected at the airport is the answer there.
And if your phone is locked to your home carrier, neither an eSIM nor a SIM card will work in it. That’s the one case where a pocket Wi-Fi router isn’t the cheaper option — it’s the only practical one.
How to Install and Activate Your eSIM
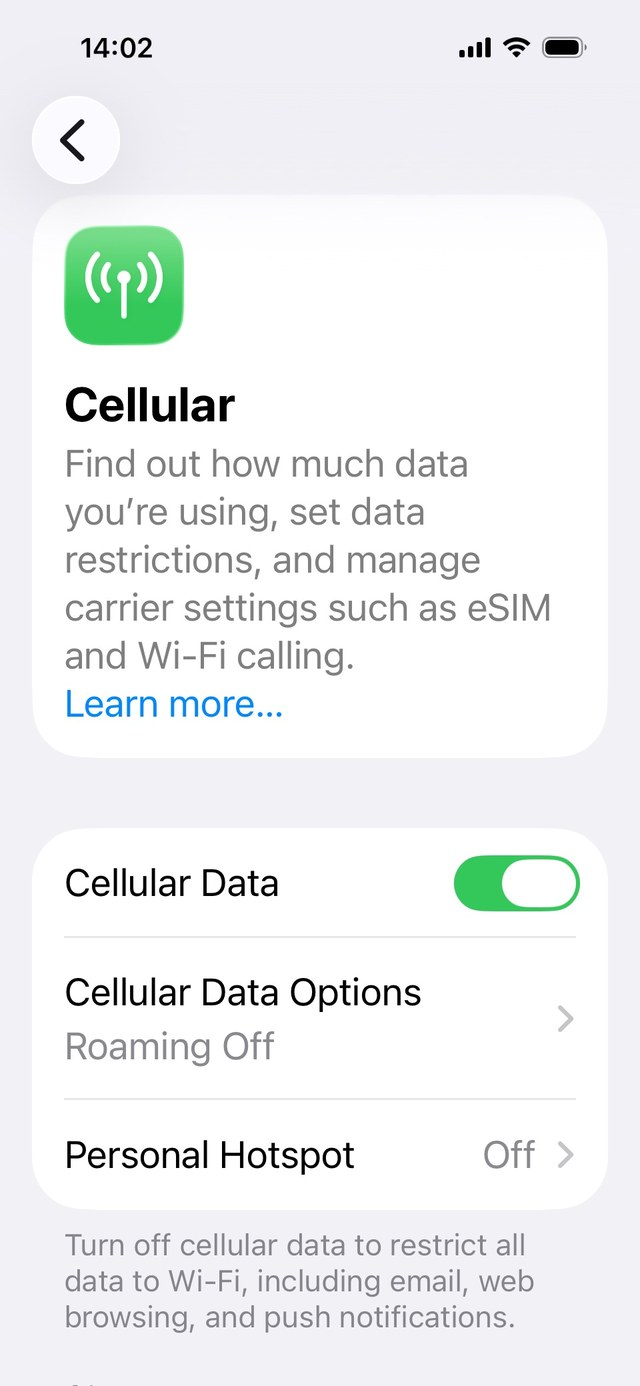
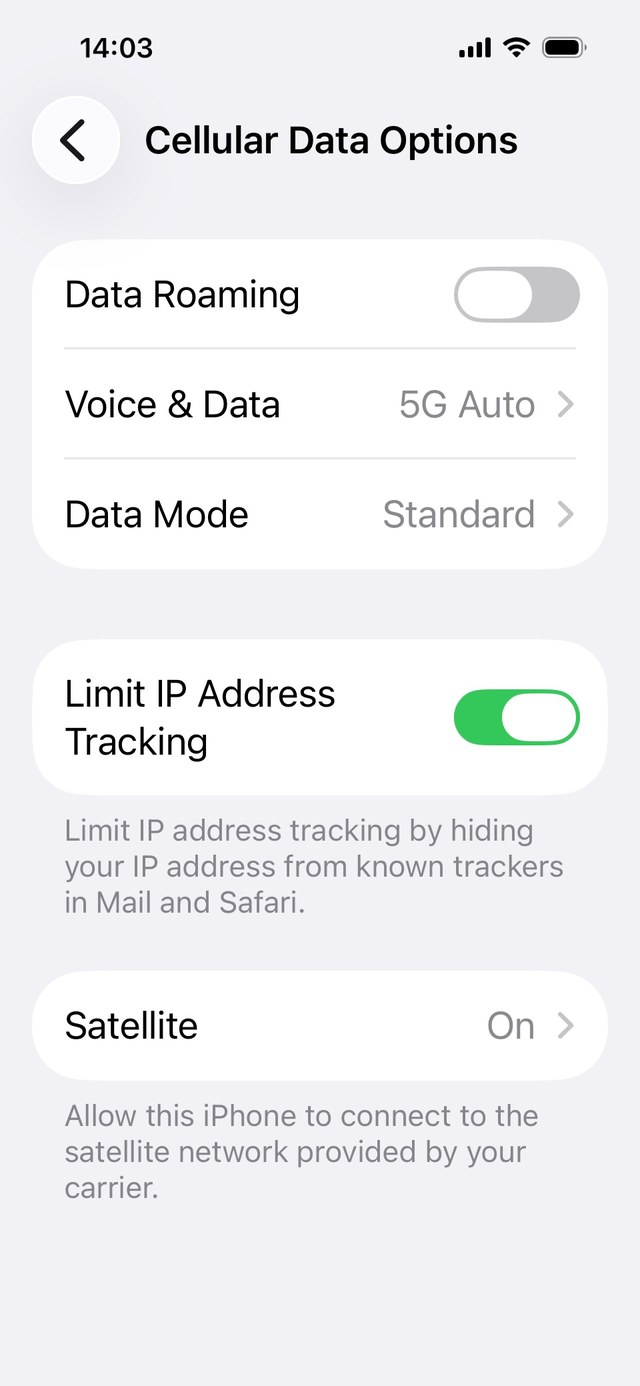
Settings → Cellular → Cellular Data Options → Data Roaming. That switch is off in the screenshot — turning it on is what gets you connected.
The single most common mistake with a travel eSIM is not a technical one. It’s assuming that installing it and starting it are the same thing. They usually aren’t, and getting them the wrong way round can burn days off a plan you haven’t used yet.
Before you buy, check two things. Dial *#06# on your phone: if an EID number appears, your phone supports eSIM. Then confirm your phone isn’t locked to your home carrier — if you bought it on a contract and haven’t finished paying, it may well be.
Buy before you fly, while you’re on your home Wi-Fi. Installing an eSIM needs a connection, and the worst possible moment to discover that is standing in an arrivals hall with no signal.
Install the profile at home, but leave the line switched off. Then check your provider’s rule for when the clock starts — most travel plans begin counting when the eSIM first connects to a network in Japan, but a few start the moment you install. If yours is one of the latter, wait and install it on arrival instead. This is the detail that quietly costs people two or three days. And note that the clock runs by the hour, not the calendar day: Klook, for one, spells out that a 3-day plan activated at 10am ends at 10am three days later — so a plan you switch on at 11pm burns its first “day” overnight.
When you land, turn the eSIM line on and do three things in your settings: switch data roaming on for that line — even though you’re using it in Japan, your phone may still treat the connection as roaming — set the eSIM as your mobile data line, and turn mobile data off on your home SIM so it can’t quietly bill you. Keep your home line active for calls and texts if you want; just don’t let it use data.
Then wait. On most phones you’ll be connected within a minute or two, but some Android handsets take five to ten minutes to register on a Japanese network for the first time. That wait is normal, and it’s the reason a fair number of travelers buy a second eSIM they never needed.
If you plan to share your connection, be aware that some plans need the APN typed in by hand in the personal hotspot settings — your provider will give you the exact string, and it won’t work until you do.
Where You’ll Actually Lose Signal in Japan

Japan has excellent mobile coverage, which is exactly why the gaps catch people off guard.
Tokyo’s subways are not one of them — the underground lines are covered, and you can keep scrolling all the way across the city. The same is true of most major urban underground networks and the shopping levels beneath big stations.
The shinkansen is where it gets patchy. On a run between Tokyo and Kyoto you’ll pass through a long series of tunnels, and your connection may drop in and out while you’re inside each one. Video calls don’t survive it. Downloading what you want to watch before you board is the practical answer, and most shinkansen services have free Wi-Fi of their own, though it’s better suited to messages than to streaming. (Still deciding whether those shinkansen rides justify a rail pass? I’ve done the math in my JR Pass guide.)
Out in the mountains is where your choice of network finally shows itself. Valleys, hiking trails, small onsen towns tucked between ridges, and the roads between them are all places where docomo tends to hold on longest and where a SoftBank-only plan is most likely to leave you looking at an empty signal bar. Ferries to smaller islands are similar — coverage near the ports, thinner in between.
None of this is a reason to worry. It’s a reason to download your route, your map area and your hotel address before you leave the city, and to have picked a network that suits where you’re going — which brings us back to the main point of this guide.
The same logic applies before you even land: save a screenshot of your Visit Japan Web QR code so it’s on your phone whether or not your data is working when you step off the plane. I explain the whole registration in my Visit Japan Web guide.
Common Problems and How to Fix Them

If you’re reading this from a hotel room with a phone that won’t connect, start here. Nearly every eSIM failure I came across in researching this guide is one of the following, and most take under a minute to fix.
You installed it but nothing happened. Installing a profile doesn’t switch it on. Go to your mobile data settings, find the new line, and turn it on.
It’s on, but there’s no data. Data roaming is switched off for that line. Turn it on. This one catches almost everybody, because it feels wrong to enable roaming on a local plan — but that’s how your phone sees it.
There’s data, but your phone isn’t using it. On an iPhone, “Mobile Data” has its own line selector, separate from turning the line on. If it’s still pointing at your home SIM, your eSIM sits there unused while you’re charged international rates by your own carrier.
Nothing is happening at all, and it’s been three minutes. Give it ten. Some Android phones — Galaxy handsets are mentioned most often — take five to ten minutes to register the first time. Buying a second eSIM at this point is the most expensive mistake on this list.
The QR code won’t scan. Most providers give you a manual option: an SM-DP+ address and an activation code you can type in instead. Look for it in your confirmation email.
Your hotspot won’t share. The APN often has to be entered by hand in the personal hotspot settings, separately from the main connection. Your provider publishes the string.
Your phone rejects the eSIM entirely. It’s probably carrier-locked. There’s no workaround in the moment — a pocket Wi-Fi router from the airport or a convenience store data plan on a spare phone is the realistic fix.
Your unlimited plan has gone slow. You’ve hit the fair use limit. It’s in the terms, it isn’t a fault, and it isn’t refundable. It’ll usually reset the next day.
You have signal but the internet doesn’t work. Check the APN field isn’t empty, and try toggling airplane mode. If it persists in one area but not another, you’re on a network that’s thin where you’re standing.
You’re worried LINE won’t work. If you already use LINE at home, it keeps working on a data-only plan — no Japanese number needed. It’s creating a brand new account that can ask for one.
FAQ: Quick Answers About eSIMs for Japan
Do I need a Japanese phone number to visit Japan?
No — most visitors travel on data-only plans without trouble. But you can’t dial Japan’s emergency numbers without one (110 for police, 119 for fire and ambulance — Japan doesn’t use 911), and some booking forms won’t accept a foreign number. If that matters to you, Mobal is the option that solves it.
Will LINE work on a data-only eSIM?
Yes, if you already have an account. Japanese businesses use LINE constantly, so it’s worth having before you arrive.
Can I make calls?
Over the internet, yes — WhatsApp, LINE, FaceTime and the rest all work fine on data. Ordinary phone calls to Japanese numbers need a voice plan.
Does my phone support eSIM?
Dial *#06#. If an EID appears, yes. Roughly iPhone XS and later, and most flagship Android phones from 2018 onwards.
When does my plan start?
Usually the first time it connects to a network in Japan — but check, because some start at installation. It’s the most expensive detail to get wrong.
How much data do I need for two weeks?
10GB is comfortable for maps, messages and photos. 15 to 20GB if you stream. And switch your photo backups to Wi-Fi only before you fly.
Can I top up mid-trip?
On nearly all of these, yes. Which is why buying the smaller plan is usually the better bet.
Is “unlimited” really unlimited?
Rarely. Most plans slow down after a daily or total threshold, and the good news is that most providers now say where that line is: Ubigi publishes its numbers, Klook says 10GB a day then 128kbps, Saily says 5GB a day then 1Mbps, and Sakura Mobile states it has no throttle at all. Holafly is the one that won’t publish a figure for Japan, which is why it isn’t my pick for anyone who wants to know what they’re buying.
Can I use it on the shinkansen?
Yes, apart from tunnels. Download anything you need to watch beforehand.
What if my eSIM doesn’t work when I land?
Lawson stores sell a prepaid eSIM card over the counter for cash, and Ministop sells IIJ’s plans through the kiosk in-store. They cost more than buying online, but they can get you connected that same night.
Can I buy one at the airport?
Yes, though you’ll usually pay more than you would have online. If you’ve read this far, you don’t need to.
Can I share my connection with my family?
On most plans, yes — but Holafly doesn’t publish a sharing allowance for Japan, and some plans need the APN entered manually first. For four people, read the pocket Wi-Fi section above before you buy four separate plans.
Final Thoughts: What I’d Tell a Friend
I get asked this in real life, and the honest answer is shorter than this article.
Buy Ubigi. Not because it’s the cheapest — Saily is. Not because it’s the most famous — that’s Airalo and Holafly, by a wide margin. I’d pick it because the thing that actually ruins a day in Japan isn’t paying three dollars too much. It’s standing at a rural bus stop with no signal, holding a timetable you can’t read, watching the last bus time you can’t confirm. docomo and au are the two networks that keep you out of that situation, and Ubigi is the easiest way for a visitor to get both.
The rest follows from what kind of traveler you are, not from what’s “best.”
If you’d feel better knowing someone will respond when something goes wrong, choose Airalo. Its support is genuinely the best here, and Ubigi’s is genuinely its weak point — I’d rather you know that going in than discover it at the airport.
If you want unlimited data and want to know exactly what “unlimited” means, choose Sakura Mobile. It’s the only provider in this guide that puts “no fair-use throttle” in writing.
If you’re already booking your tours through Klook, the Klook eSIM is a perfectly sensible choice, and two million travelers have made it.
And if there’s any chance you’ll need to make a phone call in Japan — travelling with children, staying somewhere remote, booking restaurants that ask for a local number — buy Mobal and stop optimizing. A few thousand yen is a small price for being able to dial 119.
 The one thing I’d ask you not to do is buy on price alone. Every provider in this article works fine in Shibuya. The differences only show up on the day your trip gets interesting.
Now I’m curious about your side of the world — how do you usually stay connected when you travel abroad? An eSIM, a pocket Wi-Fi router, or a heroic hunt for free Wi-Fi? Tell me in the comments below. I read every single one!
I hope this guide has answered one of your questions and helped you feel a little closer to Japan. May your Japan journey be filled with wonderful discoveries and memories you’ll treasure for years to come.
Once your data is sorted, here’s what the rest of the trip costs: my 10-day Japan itinerary for ¥200,000, every hotel and train included.
See you in the next guide. 
What to Read Next
- Visit Japan Web: Step-by-Step for Families
- Suica vs Pasmo for Tourists
- Japan on a Budget: 10-Day Itinerary & Real Costs
- Japan Travel in 2026: Price Hikes & New Rules
- Staying at an Airbnb and wondering about luggage delivery? Luggage Forwarding in Japan: Is It Worth It?



Comments