
Japan’s immigration and customs forms can now be completed online through the government’s Visit Japan Web service. It’s free, it takes about fifteen minutes, and each traveler receives one QR code that covers both procedures.
The official instructions are thorough but long, and a few things are easy to miss — how to register children, what that QR code actually does at the airport, and what to do if you have no internet when you land.
This guide walks through every step with the actual screens, answers the questions travelers ask most, and covers what changes in November 2026. Everything here was checked against the government’s own FAQ and customs pages in August 2026.

- That Moment at the Airport When Everyone’s Filling Out Forms
- What Is Visit Japan Web — And Is It Mandatory?
- 3 Things to Know Before You Register
- How to Register: Step by Step
- Registering Your Family: Kids, Babies, and One Account
- What Happens at the Airport
- Visit Japan Web FAQ: The Questions Travelers Actually Ask
- What’s Changing Soon: JESTA and the New Tax-Free System
That Moment at the Airport When Everyone’s Filling Out Forms

Picture the arrivals hall at Narita after a twelve-hour flight. Half the plane is huddled around a pillar, squinting at their phones, trying to create an account on something called Visit Japan Web — on airport Wi-Fi, with a tired toddler tugging at someone’s sleeve.
 You don’t have to be one of them. Fifteen minutes on your couch before you fly, and you walk off the plane with everything already done. And with the paperwork out of the way, the next question is usually the suitcase — my Japan packing guide for October and autumn can help with that part.
What Is Visit Japan Web — And Is It Mandatory?
The short answer: it’s optional, but it’s worth your fifteen minutes.
Source: Visit Japan Web Official Guide, Digital Agency, Government of Japan, used under PDL 1.0. Cropped and resized by A Little Japan. This guide is not affiliated with or endorsed by the Digital Agency.
Visit Japan Web is the Japanese government’s free web service for submitting your arrival information — the immigration card and the customs declaration — before you fly. Each traveler gets one QR code covering both. And it really is one code now: immigration and customs were combined into a single QR in January 2024, so if a guide you’re reading mentions “two QR codes,” that page describes the older system.
Can you still do everything on paper? Yes. Paper forms haven’t disappeared, and nobody will turn you away at the border for using them. But depending on your airline, forms may not be handed out during the flight anymore — which means filling them out in the arrivals hall, at those little standing counters.
 The service works in nine languages, including English, French, and German. It won’t make the immigration queue shorter, but it does mean you’re standing in it with nothing left to write.
3 Things to Know Before You Register
Before you type anything, three quick facts — they’ll save you money, phone storage, and stress.
1. It’s completely free
 The Digital Agency (the government office behind the service) has issued an official warning about copycat sites that charge an “application fee.” There is no fee — not for registering, not for the QR code, not for anything. Visit Japan Web never asks for payment or credit card details. The only address you need is the official one: vjw.digital.go.jp.
2. There is no official app to download
 Visit Japan Web is a browser-based service — Safari or Chrome — not a native app from the App Store or Google Play. Apps with names like “Visit Japan Web Info” have appeared in app stores before, and the government has flagged them as suspicious. Don’t download anything. Just bookmark the official site.
3. There’s no published deadline
Some blog posts insist you must finish registering six hours before landing. I went through the official FAQ question by question, and no such deadline appears in it. You can register months ahead, weeks ahead, or, in a pinch, from the departure gate. One small note: your account is deleted a year and a half after your last login, so if your last Japan trip was a while back, you may be starting fresh.
No fee, no app, no countdown. Now let’s get you registered.
How to Register: Step by Step
Grab your passport, your flight number, and the address of your first hotel. That’s everything the whole process needs.
Step 1: Create an account
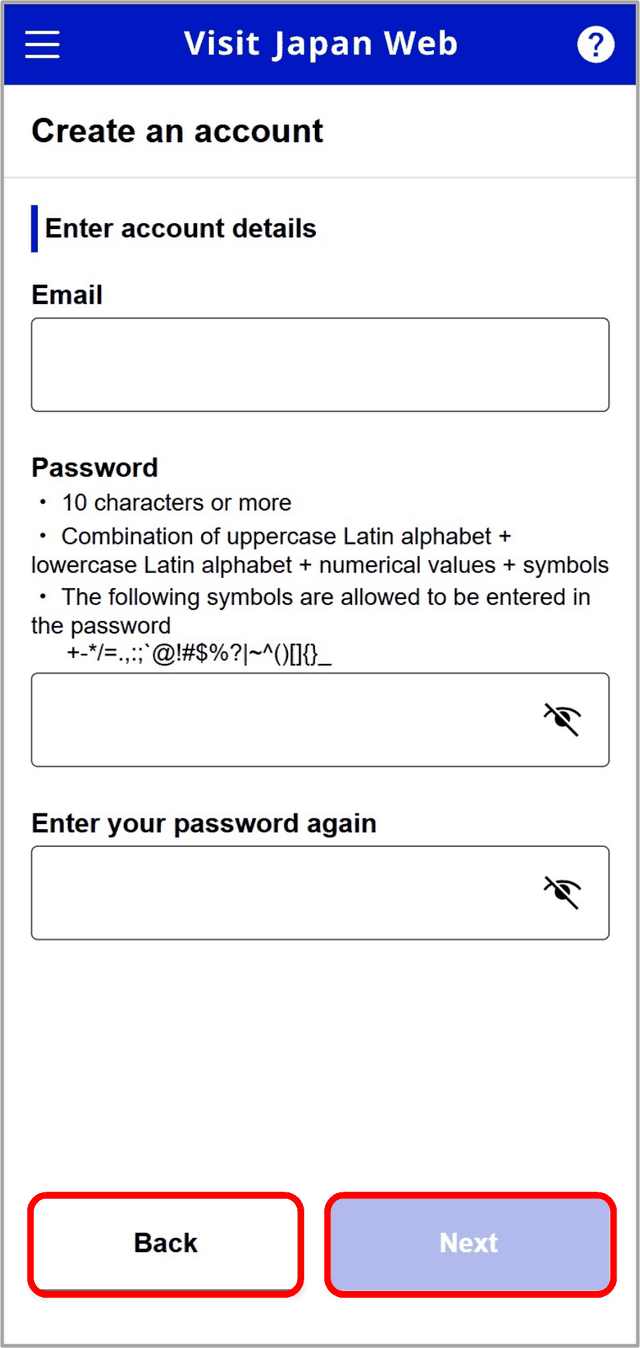
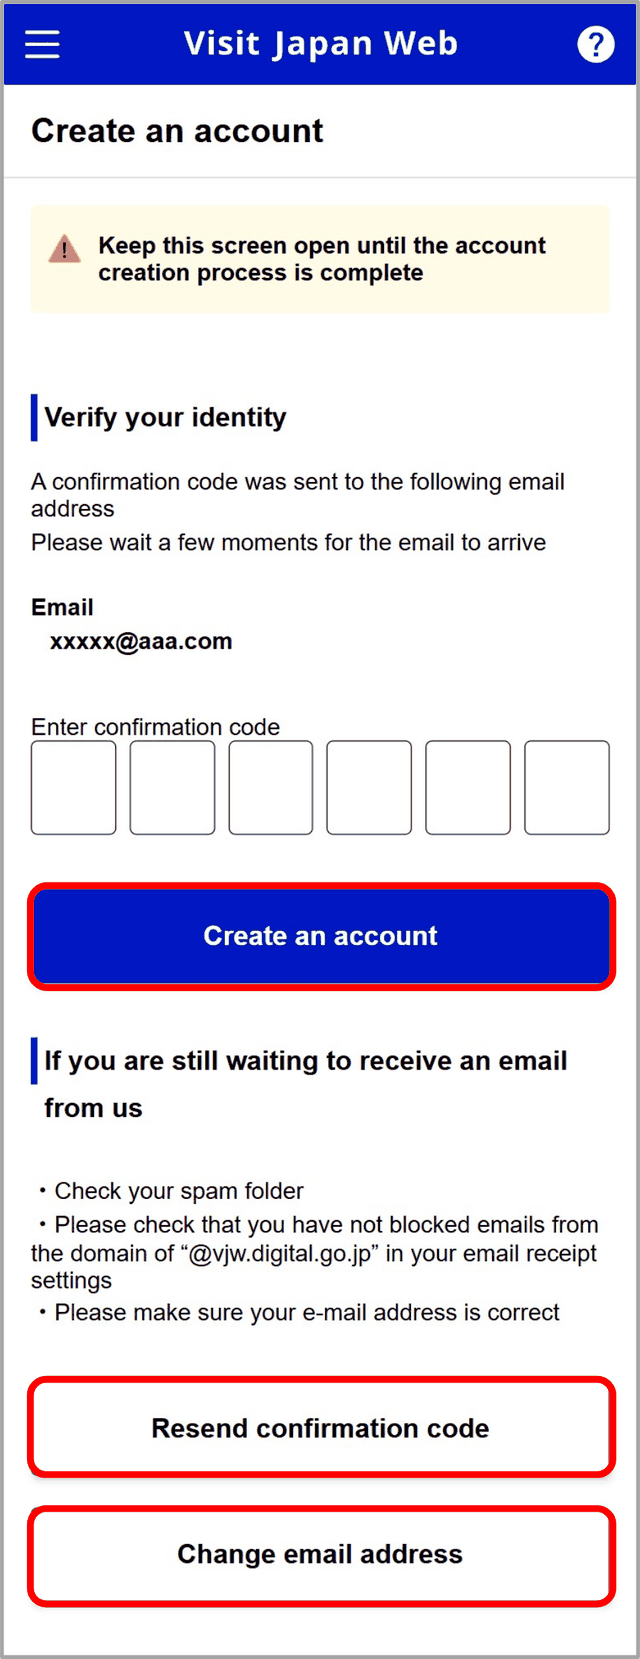
Go to vjw.digital.go.jp, tap “Create an account,” and agree to the terms. You’ll enter an email address and create a password (10+ characters with uppercase, lowercase, a number, and a symbol — the strict kind). A confirmation code arrives by email; type it in and your account is ready.
Step 2: Register your details
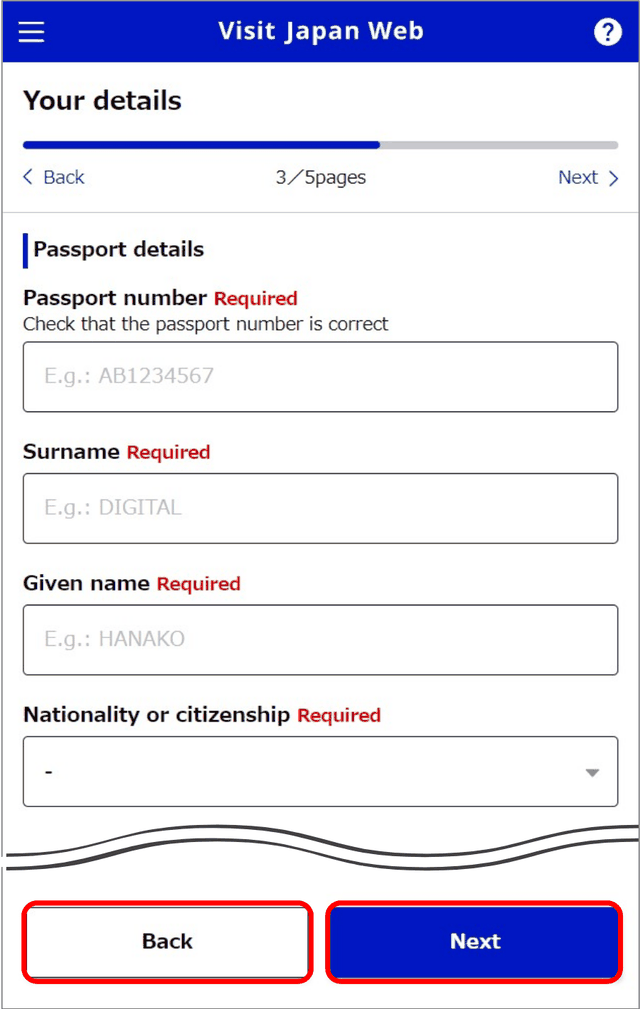
Next, the app asks for your passport information. You can scan your passport with your phone’s camera instead of typing everything out — let it do the work. It also asks for your home country and occupation; this replaces the fields you’d normally scribble on the paper arrival card.
Step 3: Register your trip
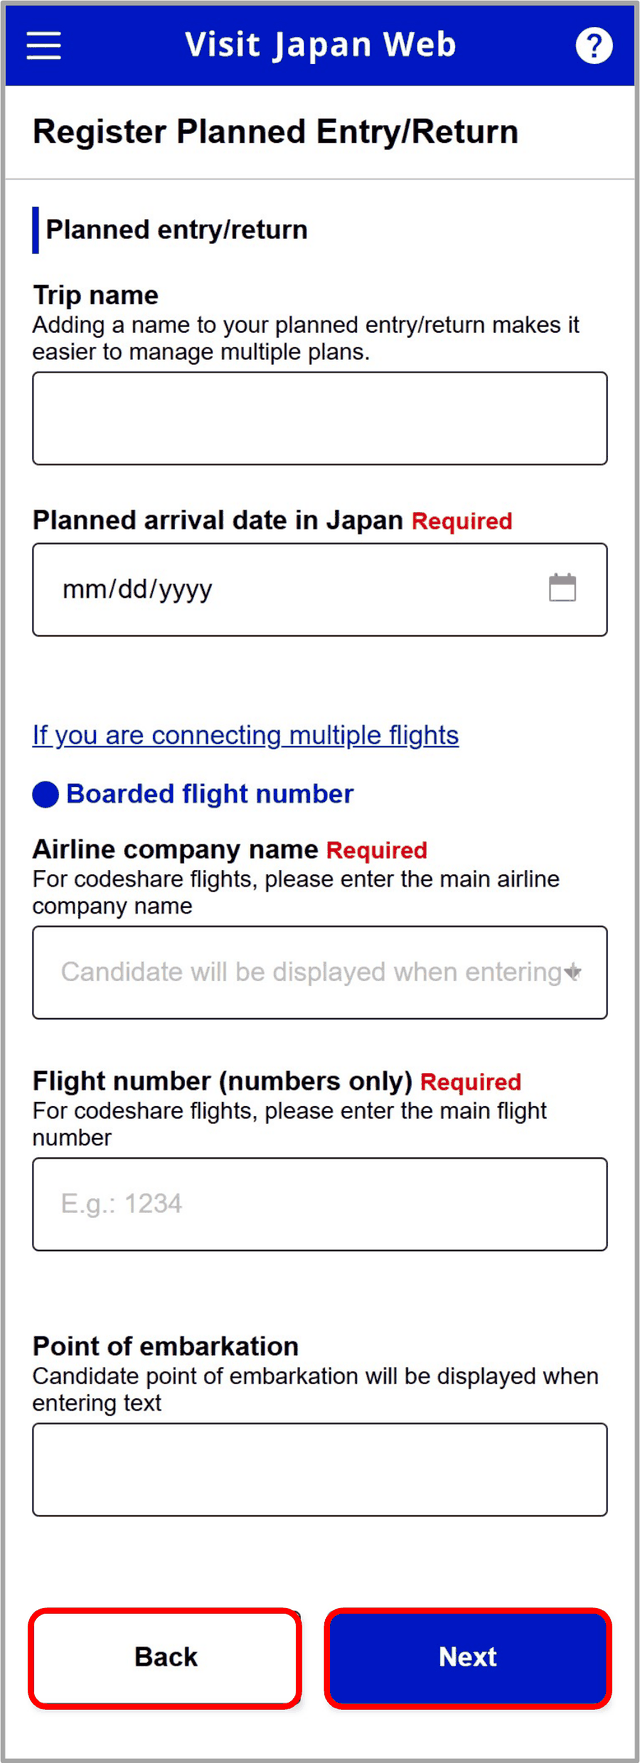
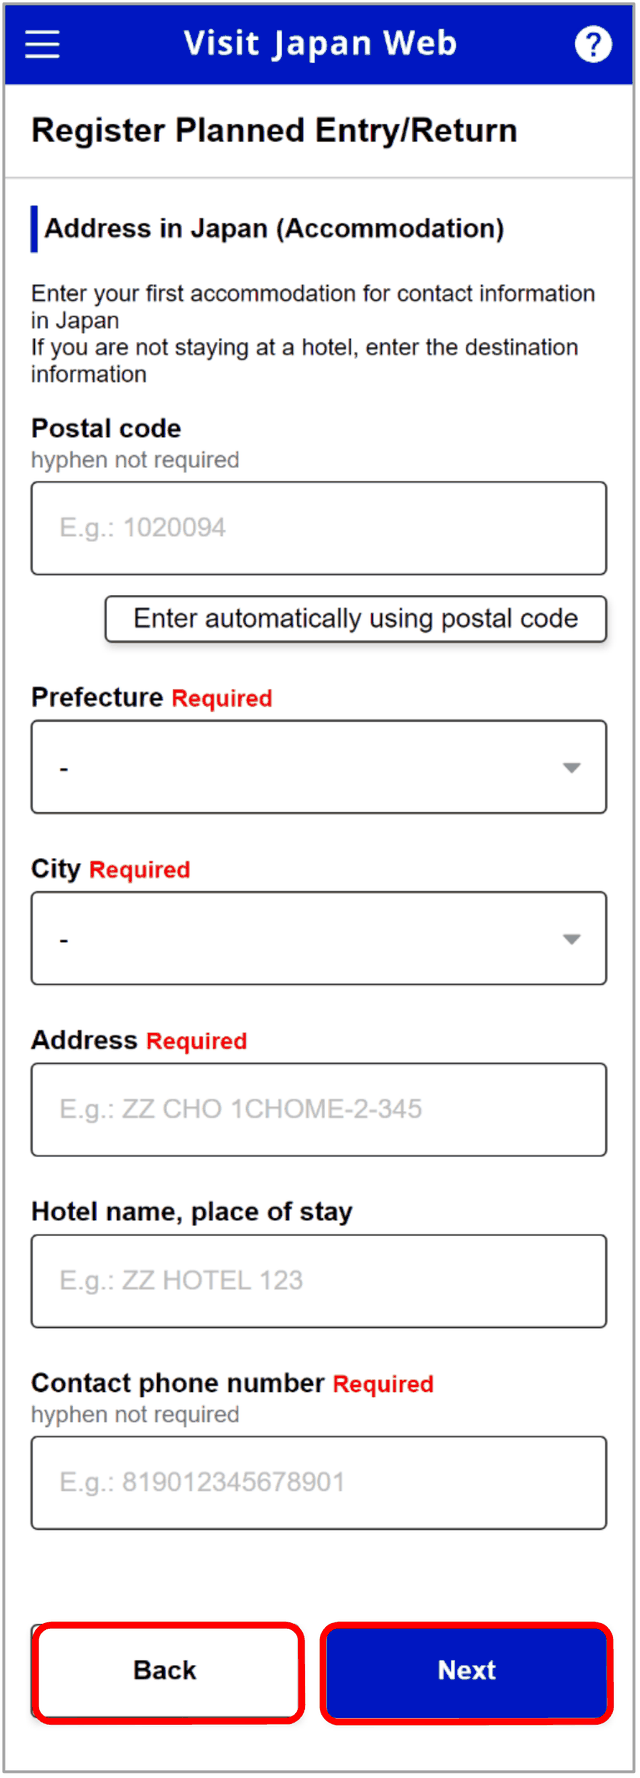
This is where your flight number and hotel go. Two small tips the form doesn’t make obvious: for a codeshare flight, enter the operating carrier’s flight number — check the “operated by” line on your booking or boarding pass rather than the number you booked under. And for the address in Japan, you only need your first accommodation. Enter its postal code and most of the address fills in automatically.
Step 4: Answer the immigration and customs questions
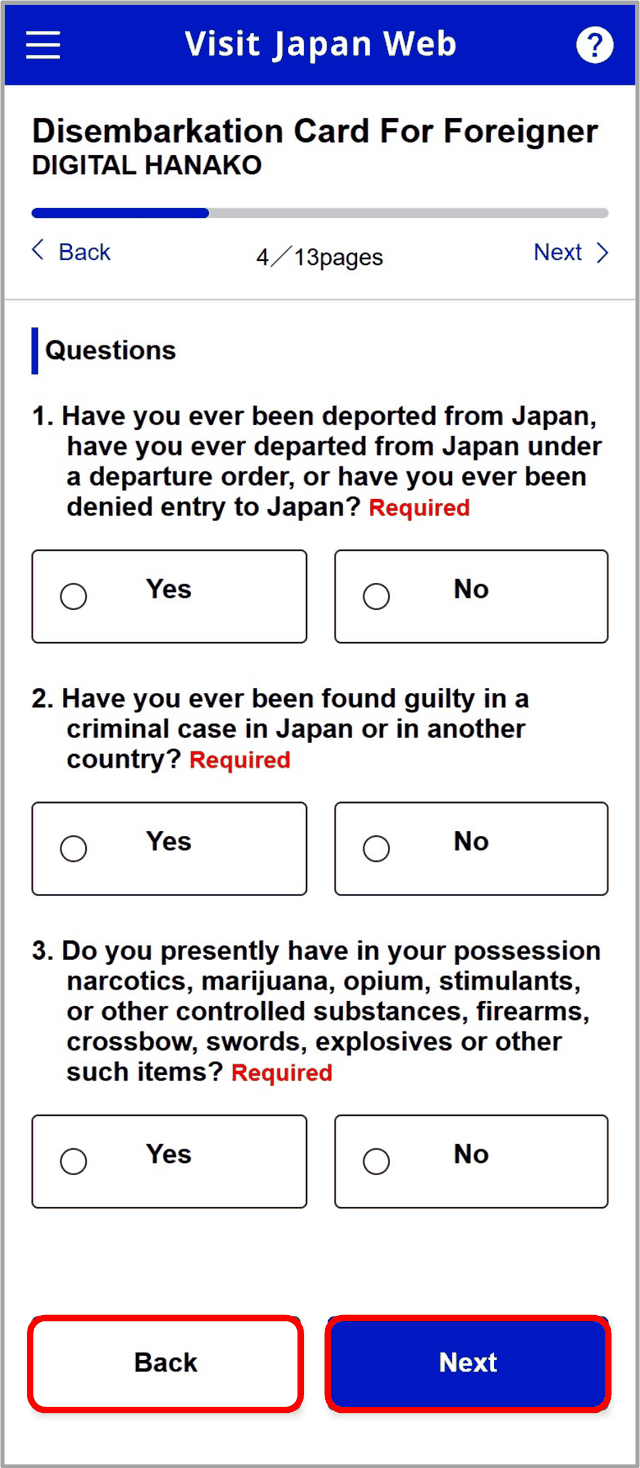
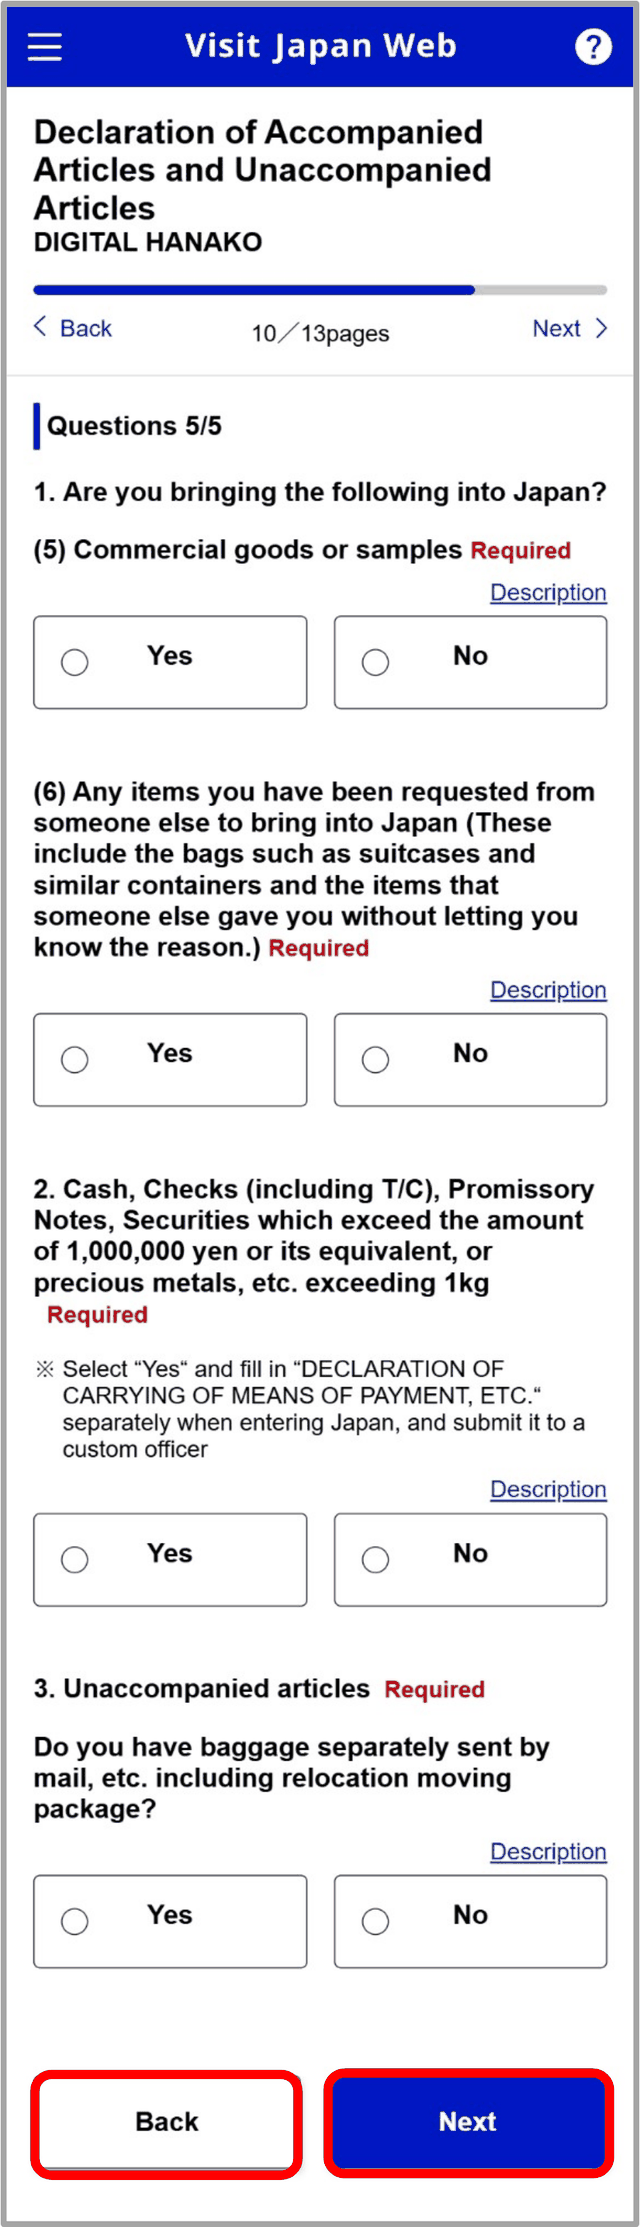
 These are the same questions as the paper forms — have you been to Japan before, are you carrying anything restricted, how much cash. Many travelers will answer “No” to most of them, but read each one properly rather than tapping through on autopilot. You can edit your answers later if something changes.
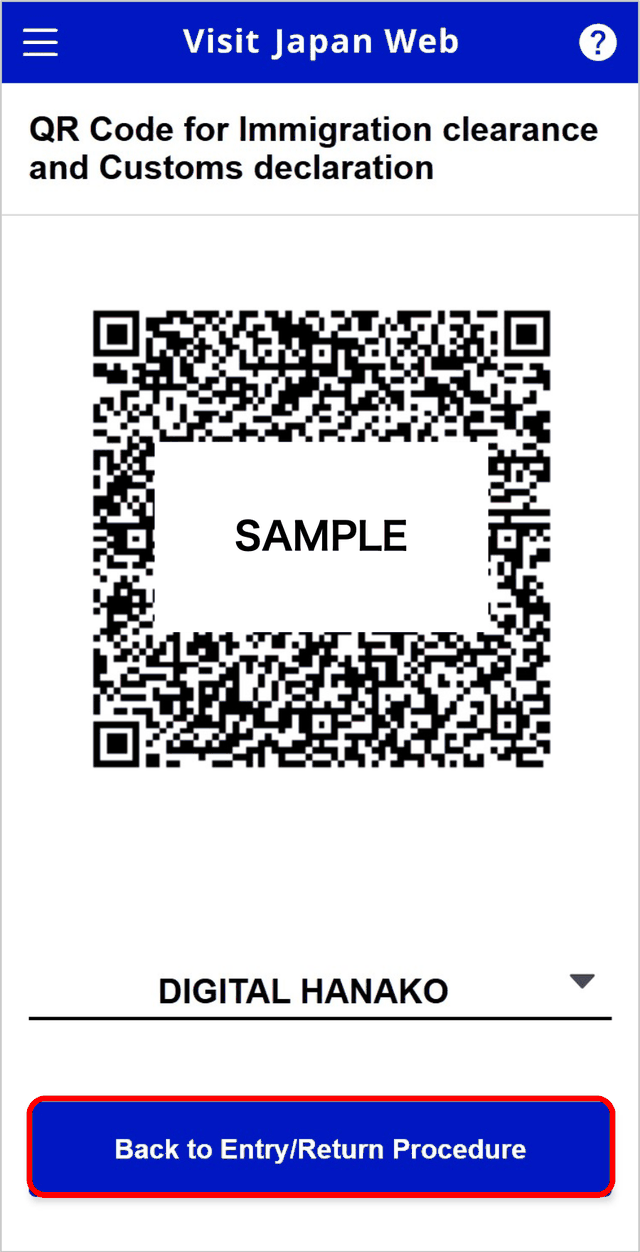
Step 5: Meet your QR code
That’s it — one QR code for both immigration and customs. It sits in your account until you land.
Total time: about 10 to 15 minutes, most of it spent finding your hotel’s postal code.
Registering Your Family: Kids, Babies, and One Account
Here’s the part that’s easiest to miss: you don’t need a separate account for every member of your family.
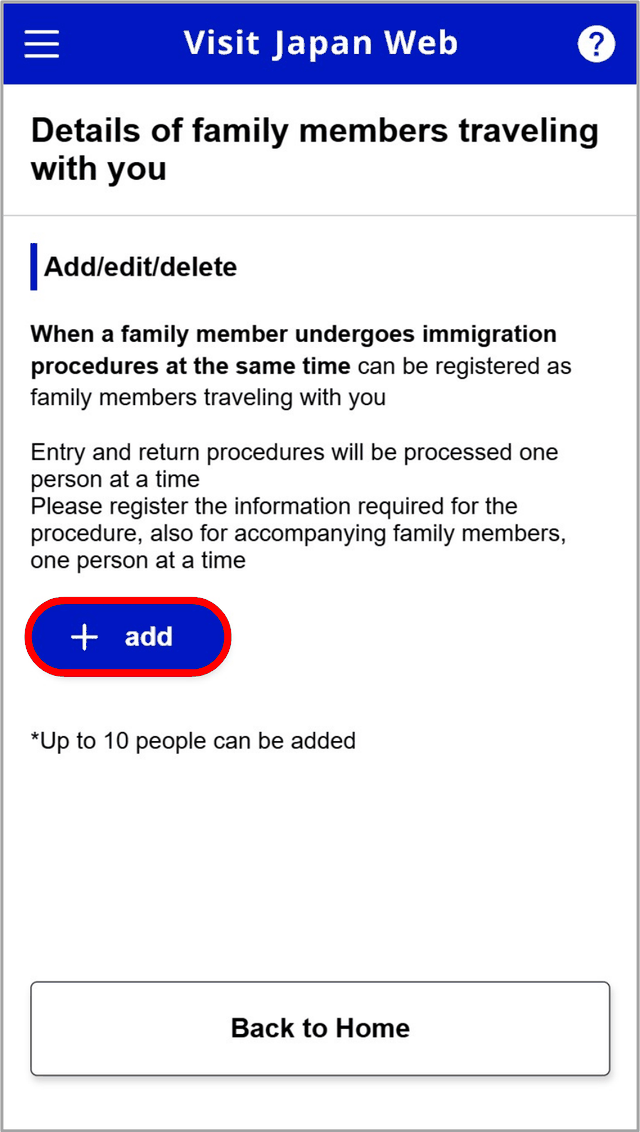
One adult creates an account and adds up to 10 accompanying family members to it. You enter each person’s passport details the same way you did your own, and when you register your trip, you tick the boxes for who’s coming along.
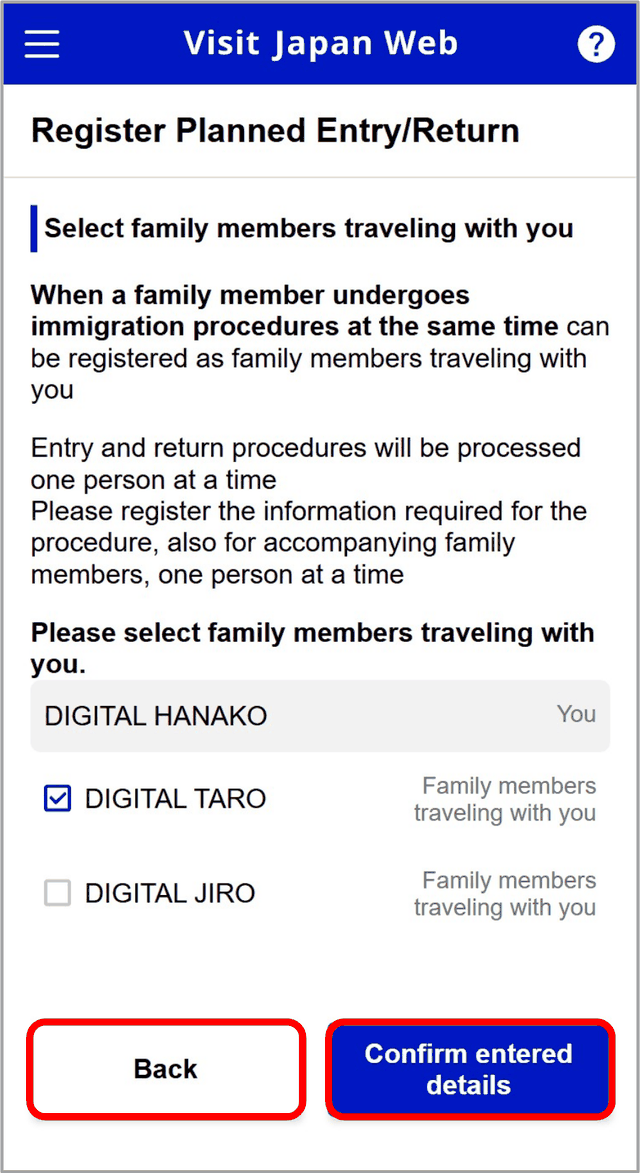
That said, adults who want their own QR code on their own phone may find separate accounts easier. The shared account really shines for children and anyone who can’t work through the form themselves.
Two things to know before you start tapping:
 Every traveler gets their own QR code — including your baby. There’s no age where children are simply “attached” to a parent’s code. The good news is that all of those codes live in the same account, on the same phone, and you switch between them with a tap.
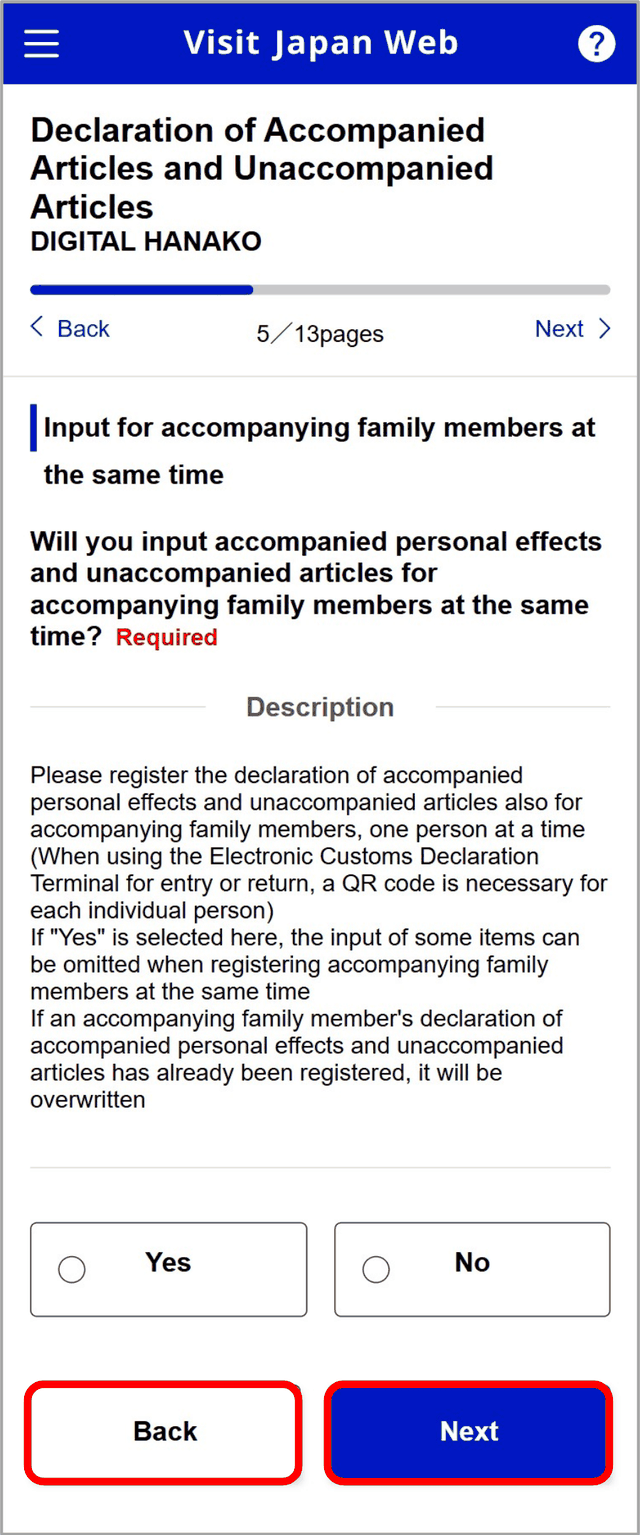
The customs questions can be answered once for everyone. When you fill out your own customs declaration, the app offers to cover your accompanying family members at the same time, so you’re not answering “are you carrying explosives” four separate times. Just know that this is about the forms — at the airport, each traveler still has an individual QR code and procedures are generally done one person at a time.
 One mom-to-mom note: the newer all-in-one kiosks can’t be used by anyone under 135 cm (about 4’5”), so if you’re traveling with small children, follow the airport staff’s directions for their immigration and customs procedures and give yourself extra time. And if you need to fix a family member’s details, that editing requires an internet connection — do your double-checking at the hotel or on the plane’s Wi-Fi, not in the immigration line.
What Happens at the Airport
You’ve landed, your QR code is ready, and your legs are stiff. Here’s what actually happens next.
Pull up your QR code while you’re still walking — the moment before the escalator is better than the moment in front of the officer. Then the path splits depending on where you land.
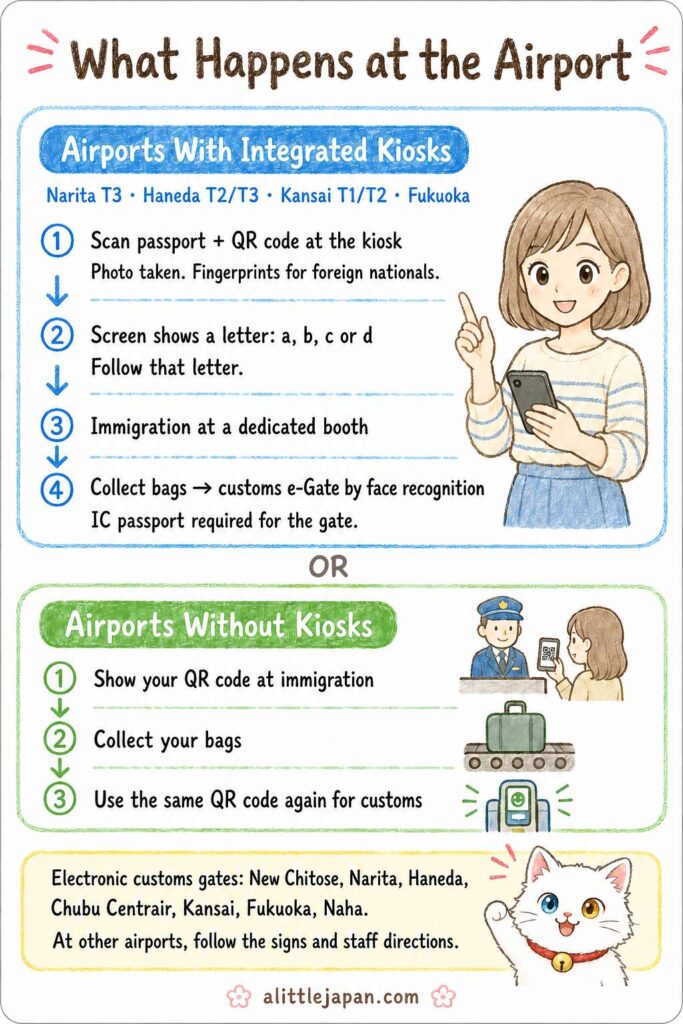
At airports with integrated kiosks — Narita Terminal 3, Haneda Terminals 2 and 3, Kansai Terminals 1 and 2, and Fukuoka — you’ll find the machines inside the immigration area. You scan your passport and your QR code, it photographs you, and for foreign nationals it takes fingerprints too. When it finishes, the screen shows a letter: a, b, c or d.
That letter matters, because the kiosk doesn’t complete your entry. It collects the information for both immigration and customs in one go, then directs you to a dedicated immigration booth — which moves quickly, because your details are already in the system. After you collect your bags, if you have an IC passport and customs determines that you don’t need an inspection, you can pass through the customs e-Gate using facial recognition. With a non-IC passport you can still use the kiosk, but not the e-Gate. And if you’re over the duty-free allowance or have unaccompanied baggage, you may be directed to a staffed customs desk instead.
At airports without kiosks, it’s the two-step version: show your QR code (or paper card) at the immigration counter, collect your bags, then use the same code again for customs on your way out. Electronic customs terminals and e-Gates are available at seven airports — New Chitose, Narita, Haneda, Chubu Centrair, Kansai, Fukuoka and Naha. Smaller airports vary, so follow the signs and the staff’s directions.
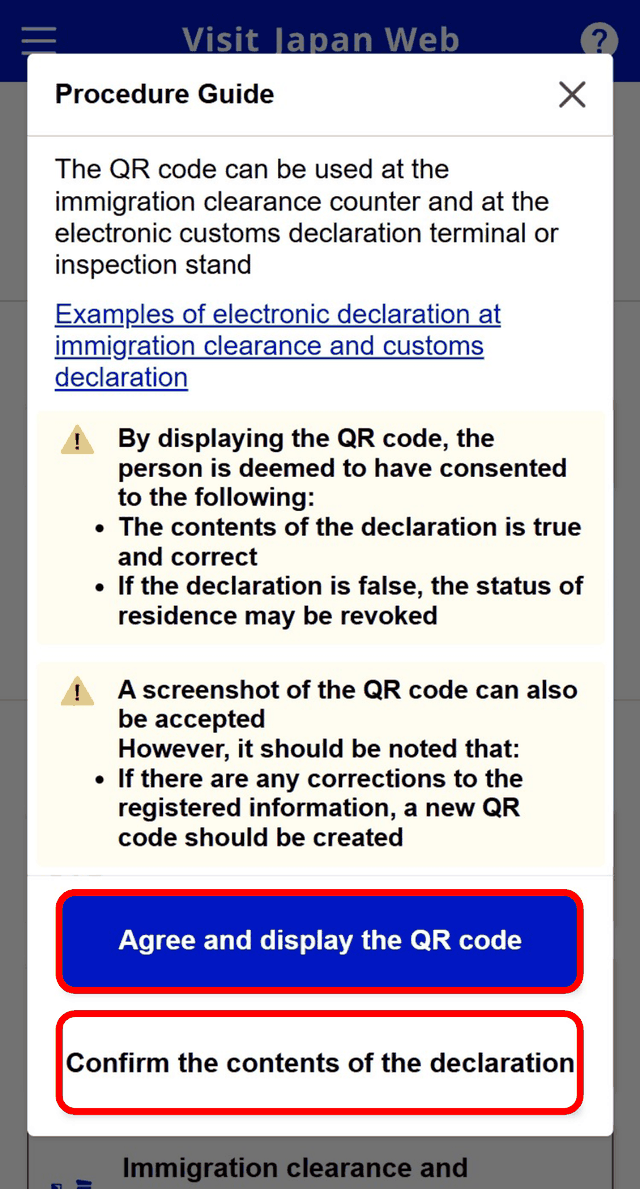
One thing worth saying out loud: displaying that QR code means you’re confirming your declaration is true. It’s a legal declaration, the same as signing the paper form — so if you bought that extra bottle of whisky in duty free, make sure your answers still match.
Two more things worth sorting before you fly: your data plan (I compare the two most popular eSIMs in Airalo vs Ubigi for Japan) and any medicines you plan to bring in (covered in my guide to getting sick in Japan).
Visit Japan Web FAQ: The Questions Travelers Actually Ask
Is a screenshot of the QR code okay?
Yes — and this isn’t a rumor, it’s written on the app’s own screen: “A screenshot of the QR code can also be accepted.” One catch: if you go back and correct any of your registered information, the old screenshot is out of date. Take a new one.
What if I have no internet when I land?
 Save a screenshot of every traveler’s QR code before you fly. That’s the simplest insurance, and it’s officially accepted.
Visit Japan Web does have an official offline mode, but it needs setting up in advance: you install the offline service on your device (adding it to your home screen) and log in while you still have a connection. Leaving a browser tab open isn’t the same thing. Worth knowing either way — because registering a new trip, or editing a family member’s details, can only be done online.
If you’d rather have data the moment you land, that’s what a travel eSIM is for — I compared the options in my guide to the best eSIMs for Japan.
I never registered and I’m already at the gate. Am I stuck?
Not at all. There’s no published deadline, so you can register on the airport Wi-Fi when you land — or skip it entirely this trip and use the paper forms in the arrival hall. Nobody gets turned away for arriving analog.
Can I reuse my QR code from my last trip?
No — each trip needs its own entry registration, so you’ll add a new “planned entry/return” and get a fresh QR code. Your account itself survives between trips, with one quiet exception: it’s deleted a year and a half after your last login. If it’s been longer than that, expect to start from scratch.
What’s Changing Soon: JESTA and the New Tax-Free System
Two changes are on the horizon, and knowing about them now saves you some confusion later.
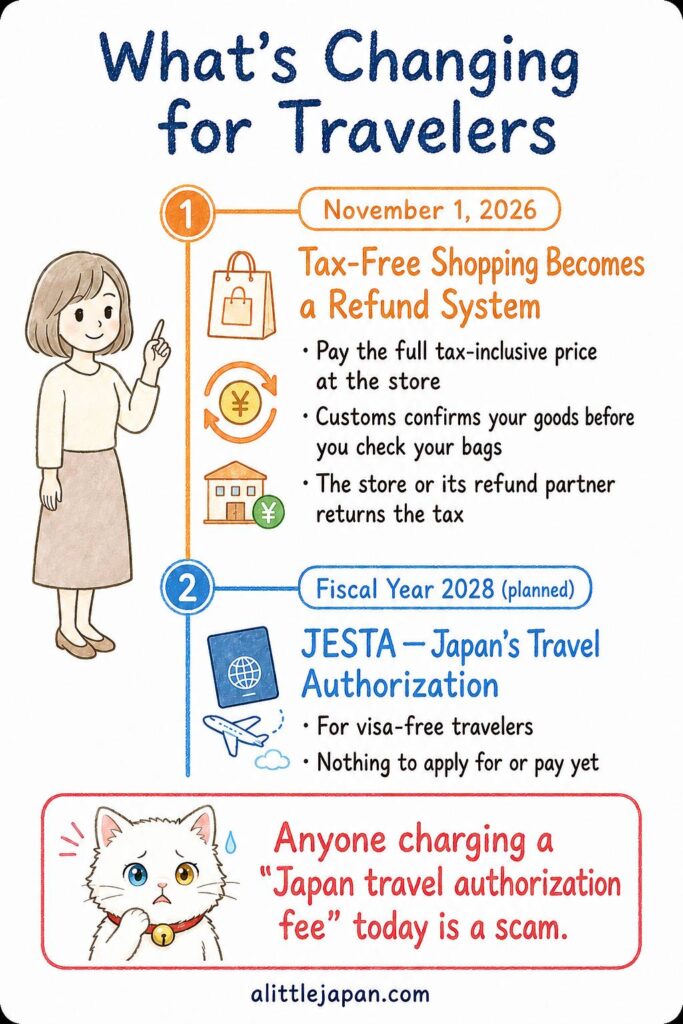
JESTA — Japan’s version of the American ESTA — is not here yet. Japan aims to introduce an electronic travel authorization system for visa-free travelers, currently planned for fiscal year 2028. You may see headlines that make it sound imminent. As of August 2026, there is nothing to apply for and nothing to pay — anyone asking you for a “Japan travel authorization fee” today is running a scam.
Tax-free shopping changes on November 1, 2026. Right now the tax comes off at the register. From November, you’ll pay the full tax-inclusive price, and customs at the airport will confirm that you’re taking the goods out of Japan — before you check your bags. The refund itself then comes from the shop, or from a refund company working on its behalf, and each retailer sets its own method and timing. Ask at the register when you buy.
Visit Japan Web also has a separate tax-free QR code that can be shown instead of your passport at participating stores. Not every tax-free shop accepts it, and it doesn’t replace the customs confirmation on your way out.
I’ve covered the customs check, refund methods, and the rules that disappear in November in my full Japan Tax-Free Shopping Guide.

That’s everything — one account, one QR code per person, and fifteen minutes of preparation that makes your first hour in Japan a lot calmer, especially if you’re arriving with tired children and too many bags. Save each family member’s QR code, keep your passports within reach, and you’ll be ready for whichever route the airport staff point you toward.
Once you’re through the airport, my Suica vs Pasmo guide explains the easiest way to pay for trains and buses.
Now I’m curious about your side of the world — does your country have an arrival app like this, or are you still filling out paper cards with a borrowed pen? Tell me in the comments below. I read every single one!
I hope this guide has answered one of your questions and helped you feel a little closer to Japan. May your Japan journey be filled with wonderful discoveries and memories you’ll treasure for years to come.
See you in the next guide. 
Source: Visit Japan Web Official Guide, Digital Agency, Government of Japan, used under PDL 1.0. Cropped and resized by A Little Japan. This guide is not affiliated with or endorsed by the Digital Agency.



Comments